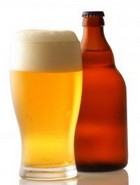
How to Make Beer in 12
Easy Steps with Excellent Home Brew Recipes
Do you know how to make beer? Home brew beer doesn't need to be difficult, nor does it have to be on the same scale as commercial beer brewing. With our easy beer making instructions and home brew beer recipes there should be no more mistakes. In 12 easy steps you too can soon be enjoying your own homemade beer.
Making homemade beer is lots of fun! If beer brewing was done back in the times of the Ancient Egyptians, then it must have been a simple process! And it is! Sometimes, people like to make things appear more difficult than they actually are. After reading our simple beer brewing instructions you will soon be brewing your own beer at home!
The best think about making home brew is that it costs so much less to make beer than to buy it. It is also a hobby that doesn't cost a lot to set up. There are no large capital outlays for buildings and equipment and the only labor costs are for those yourself.
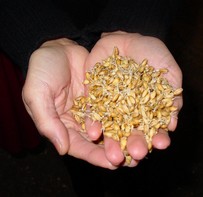
How to Make Beer? Take some barley, and just before it starts to sprout roast it to make a malt. Boil this with water to extract the starch, let it ferment, add some hops and Bob's your uncle! You have made some homemade beer! See our step-by-step beer instructions below on how to make beer at home, and then try our homemade beer recipes.
HOW TO MAKE BEER AND BEER BREWING EQUIPMENT
These days, if you want to learn how to
make beer at home or on your homestead, you can buy beer
brewing
kits that come complete to make up your first batch.
They are not too
expensive and will give you all the equipment necessary to make your
home brew beer.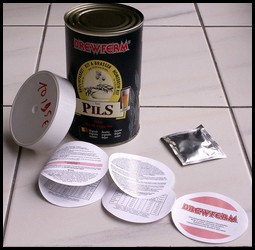
* Large Pot
* Spoon
* Bottle-Filling Tube
* Air Lock and Grommet
* Sanitizer
* Brush
* Thermometer
* Hand Capper
* Crown Seals
* Malt/Sugar Carbonation Drops
* Wort Concentrate
* Hydrometer

HOW TO MAKE BEER WITH HOME-BREW KITS
 Home-brew
kits can be
obtained from home brew suppliers, large supermarkets and some hardware
stores. This is probably the easiest way to get to know how to make
beer if you are a novice beer maker. Kits that include a fermenter with
a clip-on lid are the best.
Home-brew
kits can be
obtained from home brew suppliers, large supermarkets and some hardware
stores. This is probably the easiest way to get to know how to make
beer if you are a novice beer maker. Kits that include a fermenter with
a clip-on lid are the best.
All beer kits contain everything you need to produce homemade beer. They contain full written instructions on how to set things up, with additional instructions printed on the labels of the ingredients.
It is wiser to buy a home brew kit from a home brew supplier, as they are all experienced home brewers and will be more than willing to share their knowledge with you if you have any concerns or questions.
HOW TO MAKE BEER, THE PREPARATION
Pour the mixed powder solution into the drum. Add air lock and mixing spoon and screw on the lid. Tilt the drum backwards and forwards so that all beer brewing equipment comes into contact with the sanitizing solution. Open up the tap and allow some of the solution to pour through. Now empty the drum of the solution. Do not rinse.
If you don't have any of the sanitizing powder, take 5 gallons of water and add 5 tablespoons of chlorine bleach. Use to sterilize, empty out and rinse with boiling water to remove bleach.
HOW TO MAKE BEER, THE METHOD
2. Take a can of wort concentrate and place unopened in a pot. Add boiling water to pot in order to make the concentrate more pourable.
3. Take a large pot and add 2 liters of water and bring to the boil. Add this to your fermenting drum. Open the warm can of wort concentrate and pour into drum. Add contents of the malt/sugar bag and stir thoroughly.
4. When fully mixed, use the empty wort can to add enough water to drum until you have 20 liters of liquid for your beer brewing.
5. Stick the self-adhesive thermometer onto the side of the drum to test the temperature. The drum should be between 22-28°C before you add the yeast. If the liquid is too cold, you may want to add warm water to the mix to raise the temperature slightly. If you add the yeast when the temperature is too high, anything over 30 degrees and your yeast will end up causing your beer to taste really bad! You are looking for an ideal temperature of 25°C (75°F). When the ideal temperature of 25°C (75°F) has been reached, add more water, bringing it up to 23 liters.
6. Sprinkle the yeast on top of the wort solution. This will start the fermentation process for your beer brewing.
7. Screw lid on
tightly and push air lock into place. Partly fill the air lock with
clean water. The lock allows carbon-dioxide to escape while stopping
bacteria and wild yeast from entering. Set
aside for 5-7 days allowing
the mixture to ferment. Fermentation
should start in 4 to 24 hours.
If the weather is cold it could take a little longer. In this case, open the fermenter, stir it with a sterilized stirrer, close it back and observe for half a day. If the airlock still hasn't started bubbling the yeast was most likely dead. Add another pack of yeast. Additional yeast packs can be bought from your home-brew supplier.
You will see activity in the air lock where bubbles appear. It is time to bottle your home brew when there are no more bubbles, or when there is less than one bubble every 2 minutes. If you are not sure, use the hydrometer which came with your home brew kit. Failing to wait until this happens will cause your beer to explode if bottled too soon.
8. Sterilize
your
bottles, bottle caps and filler tube. This can either be
done by
filling the bottles with an inch or two of water and placing them in
the microwave and allowing the water to boil, or by boiling them in
pots of water on the stove. Usually, however, your home brew kit will
also have some sterilizing powder.
Sterilize by pouring approximately 0.1 - 0.2 liters of sterilizing liquid into each bottle. Shake the bottles containing the liquid so that the fluid covers the entire surface inside the bottles. Rinse your bottles with clean water. The filler tube and bottle caps can be sterilized by placing it in a bowl of boiled water.
9. Fit the filler tube onto the spigot and open the spigot. Allow the beer to enter the tube but don't allow the beer to escape from the valve at the bottom. Draw off this beer into a cup and discard.
10. Now start filling the bottles. Add some sugar before filling the bottles. Add a teaspoon of white sugar to each bottle. Adding sugar will give your beer its fizz and is also important for secondary fermentation.
11. Fill the bottles to just below the top, leaving about a 1/2 inch gap. Lower the bottle and the valve will close. It should be easy to control.
12. Once your bottles are filled, cap them with crown seals as soon as possible. Use a hand capper and a hammer to seal the cap on the neck of the bottle. Store the beer at an even temperature, in an upright position out of direct sunlight for at least 8 weeks before drinking.
During this time the beer will clear and gases will develop. Beer made in this way has no expiry date. The longer you store it, the better it becomes.Here is another Method for How to Make Beer
This beer recipe makes 5.5 gallons of beer.
1.5 kilos of light fried Malt extract0.5 kilo of crystal grain
1 packet of hops (2 ounces)
1 packet of A.H.B. imported Beer and Stout yeast or Vierka Lager yeast
1.5 kilos sugar
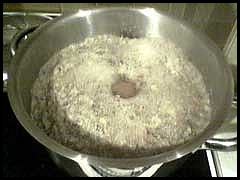
Put the crystal grain, crushed or coarsley ground and the Malt extract into a large pot with about 1.5 gallons of water, also the hops tied loosely in a nylon stocking. Bring to the boil and gently simmer for half and hour.
Strain onto the sugar in a sterlized, new trash can. Stir until sugar has dissolved.
The spent grain and the hops still in the stocking, should be washed in several lots of cold water and then this water strained into the trash can until a total of nearly 6 gallons is reached.
From the mixture, called the wort, fill a pint container 3/4 full and cool it off quickly by dipping it in cold water or in the fridge down to 75-80 degrees F. Add the packet of yeast, stop with cotton wool and keep in a warm place.
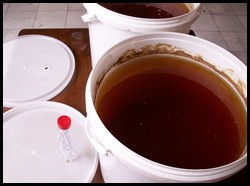
Leave in the trash can for 3 days, skimming off froth, if any, twice a day. If possible, have the can on a box or table high enough to allow the wort to be syphoned into carboy.
After 3 days, the first energetic fermentation will be over and the wort can be syphoned into the previously sterilized carboy, being careful to leave behind the sediment.
Fix the airlock, don't forget to fill this half full of water and be sure that all is air tight. This will be evident when you see bubbles of gas passing through the air-lock.
After 5 days add the finings as instructed on the packet, two days later the beer can be syphoned into the bottles, priming each bottle with a rounded teaspoon of sugar and cap.
This sugar will provide the conditioning - that is the gas which makes the froth and bubbles in your glass of beer, so don't be too generous with the sugar as a lot of beer will be lost when opening the bottles.
Keep bottles in a cool place or at least in the shade for 2 - 4 weeks. By which time your beer will then be ready to drink and be enjoyed.
Here's Yet Another Beer Making Recipe
5 gallons rain water2 oz hops
1 gallon rain water (additional)
1 lb. raw brown sugar
2 lb. malt extract
1/2 teaspoon dried yeast (as used in bread making)
2 teaspoons plain gelatine
When the hops have boiled for 30 minutes, remove from stove and lift out the bag of hops and squeeze out the liquid. Add the sugar and malt extract to the hops water. Stir to dissolve.
Empty the fermenting container and rinse out with about half a gallon of cooled, boiled water. Put the brew into the container and add the other 4.5 gallons of cooled, boiled water. When the temperature of the brew is 75 F. sprinkle with yeast and stir gently to dissolve. Place air lock on container. Don't forget to add water to the air lock.
After 24 hours dissolve gelatine in 1/2 cup hot water and add to fermenting liquid. Fermentation may take up to a week in cold weather, sometimes only 24 hours. When there are no more bubbles coming through the air lock, the fermentation is complete and the home brew is ready to be bottled.
MORE ADVICE ON BOTTLING HOMEMADE BEER
Have more bottles on hand as you will often have breakages. Not because you are clumsy but from time to time there are bottles that are defective and when you force the capping on the bottle they break.
Make sure that your bottles are spotlessly clean. Although you can sterilize your beer bottles in the microwave as mentioned there is nothing doing it the old-fashioned way. Wash the beer bottles in hot soapy water, and sterlize them afterwards by filling them with water to which a sterilizing agent has been added. Leave to stand a few hours. Then empty and rinse with cool, boiled water.
TIPS ON HOW TO MAKE GOOD BEER
- Every bottle of beer will have a thin layer of sediment on the bottom of the bottle. This is normal and does not alter the taste of the beer in any way.
- Adding a kilogram of castor sugar per 22.5 liters of fermentable liquid will result in around 5 % extra alcohol per volume over using an average beer kit. Using only half a kilogram of sugar will result in around 3.5 % of alcohol per volume.
- Water quality is very important in beer brewing. Don't use town water as it will have chlorine in it. Try and use rain water instead.
- Know how to read and use your hydrometer. The specific gravity at the time of bottling is around 1006, preferably lower. You can measure the specific gravity before the yeast goes in. That will give you the original specific gravity, minus the specific gravity at bottling (1006), divided by 7.36, plus 0.2, will give you the alcohol content of your finished home-brew.
- Knowing this, you can determine the final alcohol content at the start by adding the desired amount of sugar.
Now that you have read our beer making instructions and know how to make beer, it's time to get started!
WHAT WENT WRONG WITH MY BEER?
- The brew hasn't started to ferment: Be patient. It may help if you move the container to a warmer place. You may have killed the yeast by adding it when the liquid was too hot. If after a week there are still no bubbles, boil the whole brew up again and add more yeast.
- My beer is flat: You forgot to prime each bottle with a teapoon of sugar.
- My beer bottles exploded: You primed the bottles with too much sugar or you bottled it too soon before the first fermentation was completed.
- My beer tastes bad: The home brew may have been contaminated by wild yeast at some stage of the brewing process. Perhaps you forgot to put water in the air lock or used unsterilized utensils or equipment.
If you are absolutely sure that your equipment was sterlized correctly check the source of the water. If you are using rain water it could be that you have some dead critter floating in your tank that is contaminating the water.
| Countryfarm Lifestyles Tip: Home brew does not travel well. If you take a few bottles to friends they will be cloudy and very fizzy. Rather invite your friends over to your place to taste your homemade beer instead! |
Did you find this page helpful?
Sharing is a way of saying, "Thanks!"
Follow Us and Keep Up to Date
FREE VIDEOS ON BEER MAKING INSTRUCTIONS, HOW TO MAKE BEER AND HOME BREWING
BOOKS ON HOW TO MAKE BEER AND HOMEMADE BEER BREWING KITS
Did you find this page helpful?
Sharing is a way of saying, "Thanks!"
Follow Us and Keep Up to Date
You can Add your own Comments, Tips and Advice on How to Make Home Brew Beer here.
We have lots of pages where you can contribute to throughout this homesteading website. We love hearing from our readers, and hope you will be one of those we hear from too. Look around our homesteading website. If you have some comments, tips and advice on how to make home brew beer of your own, please submit them. All you need to do is type and submit. We will do the rest!
Leave a Comment
Do you have anything that you would like to add after reading this page? We would love to hear your thoughts. If you can add additional information to what has been written here you will be adding value to the website! No need to have any special skills - just type and submit. We will do the rest!
Don't miss out on our latest news and articles. Sign up for our free monthly e-zine!
NAVIGATION COLUMN
Find us on Google+Country Shopping
Country StoreFree Stuff
Free MagazinesHomesteading Blogs
Country Living Blog Gypsy's WanderingsCountry Living
Country Home Country Living Country Crafts Country HolidaysCountry Real EstateCraft ForumPicnics CampingSelf-Sufficiency
Self-Sufficient Living Organic Gardening Do It Yourself Easy RecipesHomesteading
Homesteading Today Homesteading Q & A Homestead Animals Urban Homesteading Homestead DirectoryGoing Green
Green LivingFarms Around the World
South Africa United Kingdom United States Canada Central America Australia New Zealand Europe Farm Photos Farming Articles True Farming Stories Farms for Sale Organic Farm ProduceMiscellaneous
Guest Book Search Site Survey Advertise with Us


OTHER SECTIONS OF INTEREST
 Homemade
Beer Recipes
Homemade
Beer Recipes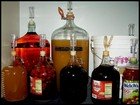 How to
Make Wine
How to
Make Wine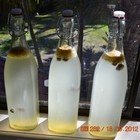 Ginger
Beer
Ginger
Beer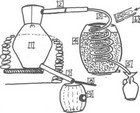 How to
Make Moonshine
How to
Make Moonshine Apple
Pie Moonshine
Apple
Pie Moonshine
Click Here
New! Comments
Do you have something of value to add? Leave me a comment in the box below.