Making a Compost Bin with Free Building Plans
For those of you who have the space, a large wooden compost bin is perfect for 3 stage compost processing. For those of you who are serious about being organic farmers and gardeners, you cannot do without compost to enrich your soil and provide the nutrients for healthy growth.
The downside of composting is that it can look an unholy mess. That is why we have provided plans for you to make your own compost bin to keep those yards tidy and to make composting easier. When building a compost bin, it is always wise to make sure that you build your compost bin with removable slats. The compost can then be removed with ease and the slated sides allow for necessary air-circulation. Here is a plan for a second wooden log composting pit.
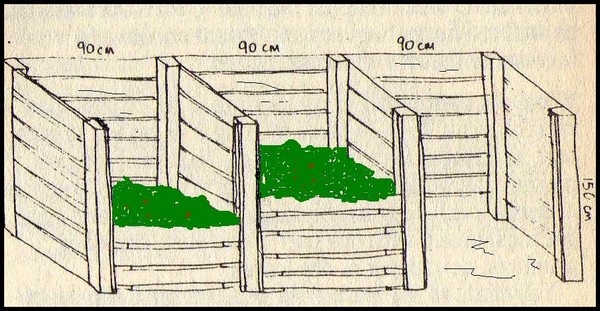
MAKING A COMPOST BIN: Materials for a 3 Bay Compost Bin: 270cm x 150cm
- Use treated pine for the total construction, and when finished cover your compost with a piece of tarpaulin or a sheet of fiberglass.
- Wooden slats for side walls and dividers: 28 wooden lengths 150 cm long x 10 cm wide x 4 cm deep.
- Wooden slats for back walls: 21 lengths of 90 cm long x 10 cm wide x 4 cm deep
- Removable slats: 21 lengths of 70 cm long x 10 cm wide x 4 cm deep
- Posts - 8 lengths of 156 cm x 15 cm x 15 cm
- Grooves - 12 lengths of 150 cm x 5 cm x 4 cm
- Spacer Blocks - 42 blocks of 15 cm x 5 cm x 4 cm
- Quick-Setting Concrete
MAKING A COMPOST BIN: Construction Method
Dig out the soil to make post holes, 30 cm square. Sink the posts by 15 cm. Fill the holes with quick-setting concrete.
Once the concrete is hard, nail the slats onto the outsides of the posts, leaving a gap of 4 cm between slats to allow air to get to your compost.
To make the grooves for the removable slats, nail two boards on to each inside face of the 4 front posts, leaving a 5 cm gap between the two boards to allow for the slats to move up and down with ease. Nail two boards either end of the two middle posts, and on the inner sides only of the two outer posts, again with a 5 cm gap.
To make the movable bars, fix 2 spacer blocks to the undersides of each wooden bar.
MAKING A COMPOST BIN - How do you Use it?
Your finished compost bin will have 3 separate compartments. The first bin compartment is for the roughly chopped vegetation that needs time to break down. Once it has reduced considerably in size move it over to bin compartment number 2. Fill the first bin compartment with new compost. Once bin 2 compartment has reduced in volume even further, place in the last bin compartment. Soon this will be the rich and friable compost that you will use on your garden.
Now that you have everything you need, get cracking and make your own compost bin to enrich your soil and grow healthier plants and vegetables. If you don't know how to make compost we will show you how.
You can Add your Own Comments on Making a Compost Bin here!
We have lots of pages where you can contribute to throughout this homesteading website. We love hearing from our readers, and hope you will be one of those we hear from too. Look around our homesteading website. If you have any comments of your own regarding making a compost bin, please add them by using this submission page below. We would love to have your contributions!
Leave a Comment
Do you have anything that you would like to add after reading this page? We would love to hear your thoughts. If you can add additional information to what has been written here you will be adding value to the website! No need to have any special skills - just type and submit. We will do the rest!
Don't miss out on our latest news and articles. Sign up for our free monthly e-zine!
NAVIGATION COLUMN
Find us on Google+Country Shopping
Country StoreFree Stuff
Free MagazinesHomesteading Blogs
Country Living Blog Gypsy's WanderingsCountry Living
Country Home Country Living Country Crafts Country Holidays Picnics CampingSelf-Sufficiency
Self-Sufficient Living Organic Gardening Do It Yourself Easy RecipesHomesteading
Homesteading Today Homesteading Q & A Homestead Animals Urban Homesteading Homestead DirectoryGoing Green
Green LivingFarms Around the World
South Africa United Kingdom United States Canada Central America Australia New Zealand Europe Farm Photos Farming Articles True Farming Stories Farms for Sale Organic Farm ProduceMiscellaneous
Guest Book Search Site Survey Advertise with Us


OTHER SECTIONS OF INTEREST
 FAQ on
Manure
FAQ on
Manure Worm
Farming
Worm
Farming Grow
Vegetables
Grow
Vegetables Ecological
Footprint
Ecological
Footprint
Self Sufficient Living
New! Comments
Do you have something of value to add? Leave me a comment in the box below.