Straw Bale Gardening for Growing Vegetables in Small Spaces
Straw bale gardening is great for growing vegetables in small spaces, for people who have houses surrounded by concrete aprons, or for those who just can't bend too far.
Straw bales have lots of uses, other than the usual ones. We can use straw bales for cheap seats, we can use them to decorate our farm shops, use the straw to build scarecrows and even houses, and we can also create a straw bale garden for growing vegetables in small spaces!
Imagine a garden that is simple to make, requires less bending, doesn't involve heavy digging, or weeding, or even much watering. Have you ever wanted to have a vegetable garden but you didn't have any soil, or you live in a place where space is limited? Straw bale gardens can be the answer to all of these, and more!
What is the difference between Straw Bales and Hay Bales?
Although at a first glance there doesn't look to be a lot of difference between staw bales and hay bales, but there is.
If you are ever wanting something to use in your garden as a mulch then you should be looking to use straw. Hay has more weed seeds than straw and straw is more resistant when wet and doesn't become a moldy mess as hay does when it becomes wet.
So make sure when you want to create your straw bale gardens that you are getting straw and not hay.What you need for Straw Bale Gardening?
So how do you grow a straw bale garden? Well, the basics, of course is that you need some straw bales. The best type to get is lucerne or soya bean nut. However, straw and sugar cane mulch is just as suitable. You will also make sure that you have a good soil mix. We suggest you mix your own using bags of compost, along with some chicken manure, and a handful of dolomite and blood and bone.
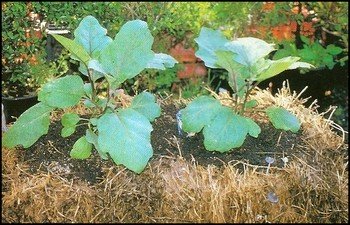
Certain vegetables do a lot better being grown in straw bale gardens like this. Those that are more successful are seedlings like tomatoes, green, red and yellow capsicums, eggplants, lettuce, cucumber, basil, parsley, mint, spinach, beetroot, turnips, etc.
Straw Bale Gardening and What to Plant
Just like growing vegetables conventionally, where you position your straw bales they must be where your vegetables will be getting at least 6 hours of sun a day. Place the straw bales on the ground so that the string is around the sides, rather than the top. Now, taking a thick stick (a sawn-off broom handle is perfect for this), jam the stick into the straw bale and move it about until you have a hole that would accommodate the size of a man's fist.
 Each straw bale should be able to hold 8 such
holes. If you are planting lettuces 8 holes is fine, if you are
planting tomatoes, then you will need to reduce the number of holes to
give your plants space to grow in your straw bale garden.
Each straw bale should be able to hold 8 such
holes. If you are planting lettuces 8 holes is fine, if you are
planting tomatoes, then you will need to reduce the number of holes to
give your plants space to grow in your straw bale garden.
There are some fundamental permaculture principles that are worth noting, so that perhaps you might think of converting your garden into something more sustainable.
Fill up the holes with your compost mix and sprinkle a handful of chicken pellets over the entire surface of the bale. On top of that sprinkle a handful of dolomite, followed by a final layer of compost to a depth of 10 cm. Now water well, using a gentle spray, soaking the straw and soil without washing the soil away. You could also finish off with a good soaking of a seaweed liquid manure.
When straw bale gardening avoid burning your seedlings. Hold off from planting your seedlings until the following week. This will allow your straw bale to settle and for the fertilizers to be absorbed into the bale. The following week, plant your seedlings into the deep holes that you created originally. Bury the seedling a little deeper than you would normally do, to allow for shrinkage of the straw bale which will occur as it breaks down over time. Water in well, feed with some seaweed manure and stake any plants like tomatoes.
Keep the plants moist and feed once a week, to every 10 days with a solution of seaweed liquid manure to keep your plants healthy. You can add a tablespoon of dolomite to the bales every alternate week to keep the compost sweet.
Another way to use your bales for straw bale gardening is to use them as a frame-work for a no-dig garden. Build your garden in the same way using layers of newspaper etc. as per the instructions I gave you.
At the end of the growing season, take your straw bale gardens, dismantle them and add them to the compost heap or use as a mulch for your garden beds.
Making a Homemade Straw Bale Cold Frame
Using straw bales to make a cold frame can be done very quickly and easily. The straw bale cold frame is put together using a double-walled panel of polycarbonate on top of the straw bales. Both materials are good insulators and unlike glass the polycarbonate doesn't break as easily and the ribs between the layers helps diffuse the sunlight evenly.
Polycarbonate panels can be bought at home centers or greehouse supply firms.
Use 12 straw bales and place 4 straw bales on the front and back rows end to end and 4 straw bales for the side rows edge to edge. This now gives you the overall area of your homemade cold frame.
You can leave the cold frame like this if you are building it off your deck or a concreted yard. However, if you want to place this cold frame into your garden then dig around the edges to show you where you need to dig.

Remove the straw bales and prepare the soil by allowing more sun into your cold frame.
This can be done by removing more soil from the front line so that your polycarbonate panel will be slowing down to catch more of the sun.
The bed in the middle of the straw bale frame where you will place your seedlings should remain level.
A straw bale cold frame covered with wood when the weather gets really cold
Place the bales back onto the soil, place your seedlings inside and cover the area with your polycarbonate panel. If the weather turns nasty you can use some wood to cover up the opening until it warms up. If the weather heats up you prop up the polycarbonate panel using a couple of pieces of 2x4.During the spring, after you have planted out your seedlings either directly into more straw bales for your straw bale gardens, or planted elsewhere, you can use the bales for mulch and store the panel out of the sunlight so it doesn't spoil.
Leave a Comment
Do you have anything that you would like to add after reading this page? We would love to hear your thoughts. If you can add additional information to what has been written here you will be adding value to the website! No need to have any special skills - just type and submit. We will do the rest!
Our Free Monthly Homesteading Newsletter
Please check back from time to time for new updates to our homesteading website or get our latest news via our free monthly homesteading newsletter. Sign up below. There is always new information being added, almost on a daily basis, just for you! We hope to see you again!Don't miss out on our latest news and articles. Sign up for our free monthly e-zine!
Go from Straw Bale Gardening back to Growing VegetablesGo to Building a Straw Bale House
Go to Green Living
Go back to the Home Page
NAVIGATION COLUMN
Find us on Google+Country Shopping
Country StoreFree Stuff
Free MagazinesHomesteading Blogs
Country Living Blog Gypsy's WanderingsCountry Living
Country HomeCountry Living Country Crafts Country Holidays Picnics CampingSelf-Sufficiency
Self-Sufficient Living Organic Gardening Do It YourselfEasy RecipesHomesteading
Homesteading Today Homesteading Q & A Homestead Animals Urban HomesteadingHomestead DirectoryGoing Green
Green LivingFarms Around the World
South Africa United Kingdom United States Canada Central America Australia New Zealand EuropeFarm PhotosFarming ArticlesTrue Farming StoriesFarms for SaleOrganic Farm ProduceMiscellaneous
Guest BookSearch SiteSurvey Advertise with Us


OTHER SECTIONS OF INTEREST
 Natural
Pesticides
Natural
Pesticides Farm
Exchange
Farm
Exchange Farmers'
Directory
Farmers'
Directory Making
Soap
Making
Soap Country
Recipes
Country
Recipes
Country Crafts
New! Comments
Do you have something of value to add? Leave me a comment in the box below.