Making Maple Syrup and Sugar - Processing, Canning and Recipes
Well, some of the best
maple syrup may come from Vermont, but who
started making maple syrup in the first place in the States? What is
the history behind this age old tradition?
First we can look at legend. It was said that an Indian woman was cooking a rabbit or some venison for stew when she ran out of water. Instead, she used some sap that was flowing freely from an opening on a maple tree. When everyone tasted how delicious the meat was cooked this way, they decided to tap more maple trees.
Whether this is true or not, if we want to track the history of maple tapping then we need to look more at the facts. Was it the Indians who taught the French colonialists, or the other way around?
Well, we do know that the Iroquois Indians who gave us the Three Sisters Garden system, also had an ancient religious festival dedicated to the maple and had a Maple Dance. Therefore, we know that the maple tree for them, had been important for a very long time.
The Ojibwa tribe also had a maple sugar festival, and perhaps other tribes did too who were involved in the making of this sweet delicacy. ot only did they have a festival, but they also had a deity connected to the sugar, as well as a special name for the months of March and April when harvesting the liquid would begin. These months were known as "sugar moon" called "Zeence-zee-bah-quod-o-kay-gezis".
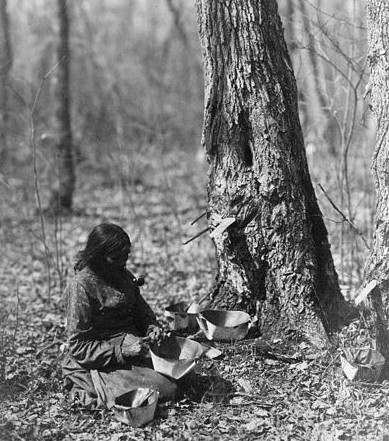
An Owijbe Woman Tapping a Maple Tree
During the maple
sugar making festival the sugar makers were invited to
the lodge of the medicine man. A piece of the old sugar from the last
season is mixed to together with a piece of sugar from the current
season. A prayer of thanks is given while this is done, and then each
present is given a little to eat. After which they then sit down to a
meal together.
The various Indian tribes all had their own words for the sap, the tree, the sugar process etc. This indicates that these words were part of their language and their culture and that they were not adopted words that were taken from the colonists. This gives us a strong indication that it wasn't the French who were the original sugar makers but the indigenous Indian population.
With the sugar maple (Acer saccharinum) growing so well in the Northern climates, it is interesting to see that it was mainly those Indians from the northern tribes who were involved in making maple sugar. New England and the region of the Great Lakes were particularly areas of development of this art, although by no means confined to just these areas.
Traditionally then, sugar making from the maple was done by catching the sap by dishes and bowls placed at the bottom of the trees. The sap was usually caught in birch dishes and boiled in earthen kettles. The small quantity of dark, thick syrup was then cooked down further to make the only type of sugar available to the Indians at that time.
When the early settlers came to America, their sugar soon ran out, and with no sugar cane around, they came to rely on the Indians for their sugar, and the knowledge of how to make maple sugar themselves.
For more than 100 years the collection of maple sap for syrup didn't change much at all. Slowly some changes came about when iron or copper kettles were preferred to the bark and clay kettles, and the sap was then collected in buckets rather than using the birch bark bowls. But still it was boiled in outside open shelters in the woods with no protection from the weather, or from ash, falling leaves, twigs and dirt that all found its way into the boiling sap.
Today, of course, although there still hasn't been much change in the process of making maple syrup from sap; buckets are covered, and these days we understand why it is good to prevent any kind of debris from falling into the sap.
Which Trees are used to Make Maple Syrup?
Making Maple
Syrup, is done by using the sap from the hard
maple trees known as Acer
Saccharinum, However, there are people who
have also managed to tap sap from the soft maple varieties. Black and
Norwegian maple trees are preferred after the sugar maple for making
sugar.
When can you start Tapping Maple Trees?
Maple tapping starts in February,
when the sap starts to run, and if
you are lucky to live in maple tree country, such as in Vermont, New
York, Ohio, Michigan, Pennsylvania and New Hampshire, then you will
want to try your hand at tapping the syrup from the trees and making
your own sugar.
Once refined, there is no difference in appearance or quality between sugar that has been made from sugar cane, or sugar that has been made from the maple trees. Traditionally that sap was gathered, processed and then formed into solid cakes.
Once refined, there is no difference in appearance or quality between sugar that has been made from sugar cane, or sugar that has been made from the maple trees. Traditionally that sap was gathered, processed and then formed into solid cakes.
Equipment for Maple Tapping
It is important to have
the right equipment for making maple syrup, and
making sure that you have a complete set for every tree you want to
tap.
- You will need a spile -
traditionally made from
the sumach bush. These days you can buy a metal spile or spout
from your hardware store. You will need one for every
bucket.
Ready-made spouts can be bought with a hook on them where you can hang your buckets. These spouts are usually made of galvanized iron, a few inches long, and about an inch wide.
Or, you can make your own spiles using sumac wood. Use 4 inch lengths of wood which has been hollowed out. If you are using sumac, make sure you use the wood from the red berry sumac, as wood from the white and green berried sumac bushes are poisonous. If you are using the sumac spiles, than you will need to tap in a 4 inch nail just above the spout to support your sap bucket.
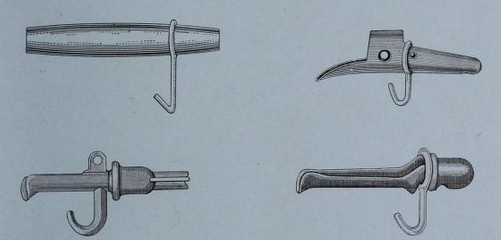
Traditional Maple Spouts
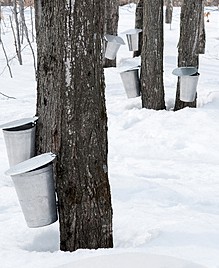
- You will also need a bucket for every tree. On a good day you could end up with 5 quarts of syrup per tree, so make sure that your buckets will be big enough to hold the sap. 2-3 gallon galvanized buckets are perfect for maple syrup collection.
- You may also want to have a cover for every bucket, as even if you strain the sap and remove the leaves and twigs that may fall into the sap as you are tapping, it will still end up contaminating the syrup.
- Besides your bucket and spout you will also need a hand drill or small auger to make the hole, and a wooden mallet to knock your spout or spile into the tree.
- For the processing of the sap you will need a large pot for boiling it in, a strainer and a ladle. It is cheaper to process your sap over an open fire, but then you don't have a lot of control over the heat as you would over an electric or gas stove.
- Finally, if you are wanting to make Maple Sugar then you will need large tin evaporation pans.
How to Tap Maple Trees and Collect the Sap
 You need to make
a hole 2-4 feet off the ground,
into the south side of the Maple tree. In times past, people used to
tap 4 feet off the ground. However, nowadays, people prefer tapping 2
feet off the ground.
You need to make
a hole 2-4 feet off the ground,
into the south side of the Maple tree. In times past, people used to
tap 4 feet off the ground. However, nowadays, people prefer tapping 2
feet off the ground.Choose the larger trees for sap collecting, that is any tree that is more than 10 inches in diameter. The south side is known to give out more sap on a sunny day.
The hole should not be more than a 1/2 inch in diameter, and don't go more than 3 inches into the tree. The main sap is not found in the center of the tree, as some people think, but actually just under the bark.
You want to tap the tree wisely, and even going 2 inches into the bark would be enough. The hole should be deep enough to take the spout and the weight of a full bucket without pulling out, but not too deep that it does damage to the tree.
The other thing you have to take care of is the diameter of the hole itself. Any hole bigger than 1 inch will damage the tree. You don't want to end up killing the Maples. You want to make sure that you tap sustainably. Over the years, the tree will fill in the hole with new plant tissue. You will need to tap in a new place the following year, not from the same tap hole, and at least 6 inches from the previous scar.
You can put two taps into a tree but only add 1 extra tap for every 6-8 inches in diameter, in addition to the standard 10 inch diameter tree. If you have a tree with more than a girth of 2 feet you can put in 4 taps, but no more.
When making the hole, make it so that you are not going into the wood straight, but at a slight angle downwards (10 - 15 degrees) to facilitate the flow. After making the hole with your auger or drill make sure that you remove any wood dust or chips from the hole and that it is totally clean. This will also help with the sap flow, as well as making sure that you have nothing contaminating your sap. Pure sap makes the clearest syrup and best sugar.
As soon as you drill your hole, tap in your spout or spile with a wooden mallet and hook your bucket onto this. Note I said, "tap" rather than "knock" as you need to do this gently. If you hammer the spout into the tree you can run the risk of splitting the bark and damaging the tree.
Place the covers on the buckets and wait for your sap to run. Most sap runs between 9 in the morning to midday, after that it slows down. It is this morning sap that contains the most sugar, rather than the afternoon runs.
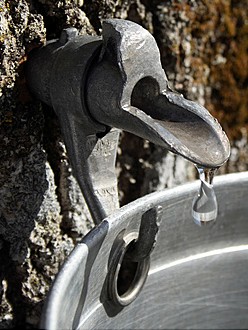
Maple Sap Dripping into a Bucket from the Spout
Only tap after the worst of the cold
weather has passed. You don't want
to find that your sap has frozen. Also, once you have collected your
Maple sap, don't allow it to warm up as it will sour. You need to boil
it as soon as it has been gathered for the best results.
The best sugar will be made from the early runs in the season. Later in the maple sugar season you will find that the sugar made from this sap will be darker, and not as pure. This is because more lime, potash, magnesia and other substances are now present in the sap. And so, by the time the tree has started to open its leaf buds, the sap is no longer worth tapping as the sugar will not be good at all.
Stop tapping when the sap is a pale to bright yellow color as this is a sign that the tree is about to bud and then the sap will be no good for making maple syrup.
Instructions for Making Maple Sugar
Type of Fuel for Making Maple Sugar
In the olden days, it
was important to have the right type of wood.
This was because you needed a high heat to get the sap to a roaring
boil, and you can only do that if you have dry wood. It didn't matter
what sort of wood it was, but it had to be dry. Therefore
better to use
wood from last season, dried well, and stored before the rains started.
Maple Sugar Making Process
When you boil the sap,
take care that it doesn't burn. Many an old
timer will tell you that if your syrup weighs 11 pounds to the gallon,
your sap has just the right amount of water content to make good syrup.
You want it thick enough to taste right, but not too thick that it will
granulate. As a result, as soon as the syrup reaches a temperature of
219 degrees F.
at sea level, and remove it from the heat. For every 550
ft about sea level , add 1 degree Fahrenheit to this temperature.
However, this can take quite a while to get to this heat as for most of the time you will just be boiling mainly water from the sap and the temperature here will be your normal boiling point for water at 212 degrees F. If you have say 6 gallons of sap, it will take 4-5 hours before you get to the point where the sap will turn to syrup.
While you are boiling your sap, because most of the content is water, you don't have to watch it that much. It is only towards the end, when the water has evaporated away, and the temperature moves north of 212 degrees F. that you have to watch that it doesn't climb too high and you end up scorching or burning your syrup.
If you are boiling the sap inside the house, oven as many windows as possible, or boil it outside, as there is a lot of evaporation involved, and you will have condensation everywhere!
You will know when your maple syrup is near the end when it starts to get a thick white foam on the top. You need to skim this off as it develops and discard. You will need to make sure that you have a big enough pot for boiling the sap as when it gets to this stage there is always a danger of it boiling up and over the sides of the pot.
If you are worried about this happening, you can add just a drop of cream or a tiny bit of butter into the mixture, and it will go back down again. It is important to keep up a rapid boil so that you can reach that desired temperature of 219 degrees F. at sea level.
Now strain the syrup to remove any dark-colored impurities. This stage is important as there will always be "sugar sand" - a granular calcium compound that needs to be removed. Using coffee filters are good for this. After it has been strained, put it back on the heat and boil briefly at 212 degrees F. before pouring the finished maple syrup while still hot into sterilized mason jars and seal. If you want to filter again through the coffee filters, you can do this as you are pouring the syrup into the jars.
The best maple syrup is light in color. Light amber is what you are aiming for. Anything darker than this will not have the maple syrup flavor you are after, although it is still perfect for home use. Your maple syrup will last a long time without the need for any artificial preservatives.
A gallon of syrup will make between 8-10 pounds of sugar.
How to Make Maple Sugar
If you don't watch your
maple syrup in its final stages, what you will
end up is granulated
maple sugar. However, you will need a sugar
thermometer at this stage to control the heat, and differentiate
between making the different maple sugars required.
You can make both soft and hard maple sugar. Both will keep well if stored in air-tight containers.
You can make both soft and hard maple sugar. Both will keep well if stored in air-tight containers.
How to Make Soft Maple Sugar
To make soft maple
sugar, cook your maple syrup on a high heat bringing
it up to 242 degree F. and then let it cool to 155 degrees F. Stir
until
it becomes thick. Then pour it into molds.
How to Make Hard Maple Sugar
Boil your maple syrup to
245 degrees F.
And cool it to 150 degrees F.
Stir until crystals form. Take the finished product, once cooled and
store in air-tight containers.
How to Make Granulated Sugar
Although maple sugar is
traditionally made into cakes or bricks, it can
also be made into granulated sugar. This is done by boiling the syrup
to 240-243 degrees F.
This will make a medium hard sugar. When it is
stirred enough to make a good sugar grain, it can be poured into
moulds.
However, if you carry on stirring without moulding it, it will granulate and form what is called "stirred sugar".
If you allow this sugar to dry out, you can then pound this sugar with a pestle and mortar and make it quite fine. The trick though to doing this, is to make sure that you are able to dry the sugar out without burning it. Large evaporation pans are used here, rather than the large iron pots. The shallowness of the pans allows for better evaporation.
How to Store Maple Sugar
Sugar should be stored in a cool, dry place. If you are going to store it in tins, place a piece of wax paper underneath the tin lid. If you don't, the sugar is likely to go mouldy and can ferment.Maple Syrup Recipes
There are very few
recipes that use maple syrup in jam recipes because
the flavors are too strong and will overpower the fruit. However, we do
have a candy recipe here for you, as well as a recipe for maple butter.
Once the syrup has reached the desired temperature whip the mixture with an egg beater until it is creamy.
Tip: Make small batches of maple butter at a time to reduce the risk of crystallization.
Maple Butter
Maple butter, is also known as maple cream. Coat the inside of a pot to prevent foaming. Pour in maple syrup and cook until the temperature reaches 111 degrees F. Remove from heat and cool to 10 degrees F. If you are in a hurry you can reduce the temperature by either placing the syrup in a bowl into another lined with iced water, or you can place it in the deep freeze.Once the syrup has reached the desired temperature whip the mixture with an egg beater until it is creamy.
Tip: Make small batches of maple butter at a time to reduce the risk of crystallization.
Traditional Jack Wax - Maple Syrup Candy for Kids
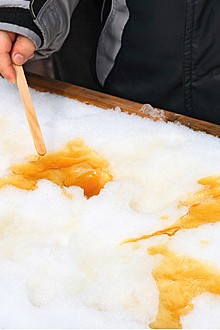
Over the generations of
making maple sugar and syrup there has always
been a treat for the kids in making Jack
Wax.
This candy is made once the maple syrup reaches a temperature of about 230 degrees F.
Remove some of this syrup and pour it directly on the snow outside, either in strands or in a thin layer.
You will end up with brittle toffee that both you and the kids will love to eat. Enjoy!
This candy is made once the maple syrup reaches a temperature of about 230 degrees F.
Remove some of this syrup and pour it directly on the snow outside, either in strands or in a thin layer.
You will end up with brittle toffee that both you and the kids will love to eat. Enjoy!
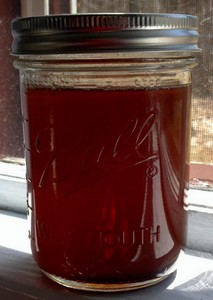
Canning Maple Syrup
 If you want to keep your
maple syrup for a long time, then it is best
to think of canning it. However, because you will end up with too much
head space if you canned it using the hot method, it is better to can
maple syrup cold.
If you want to keep your
maple syrup for a long time, then it is best
to think of canning it. However, because you will end up with too much
head space if you canned it using the hot method, it is better to can
maple syrup cold. Too much head space means that your syrup could either crystallize or ferment as it shrinks under high heat. Therefore it is better to can your maple syrup cold or at a temperature no more than 100 degrees F.
Whether you can your maple syrup cold or at 100 degrees F. this is done only after the syrup has been completely strained of all foreign bodies, allowed to settle for a couple of hours until any cloudiness has disappeared.
Pour the syrup into sterilized jars, making sure that any bubbles that have formed have come to the top. You can encourage these to surface by banging the bottom of the jar gently on the counter top, or by banging the bottom of the jar with the palm of your hand.
Continue pouring the syrup into the jars until the liquid is at the top of the necks of the bottle.
As long as you have expelled all the air bubbles and filled the bottles to the very top with very little head space, your maple syrup will last from one season to the next.
Tip: If you find that the syrup has fermented, you can change this by boiling it up again, and skimming it. Then place back in new sterilized jars.
Conclusion:
Well, we hope that if you have some maple trees in your garden that you will have a little fun with your kids and tap a couple of trees and carry on the tradition of making maple syrup and sugar.Don't miss out on our latest news and articles. Sign up for our free monthly e-zine!


OTHER SECTIONS OF INTEREST
 Maple Syrup Recipes
 Three
Sisters Garden
Three
Sisters Garden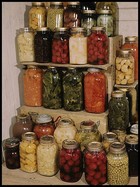 Home
Canning
Home
Canning Self Sufficient Living
 Country Recipes
New! Comments
Do you have something of value to add? Leave me a comment in the box below.