Basket Making for Beginners; How to Make a Basket from Willow, Reed, Cane
Basket making, or basketry, is an old traditional craft. Learn how to make a basket today from cane with our easy, step-by-step instructions. Making homemade baskets for beginners made easy.Willow and Basket Making
Willow, for example is an ideal material that can easily be bent and woven to form very strong baskets. It is harvested in the winter when the sap is down, and is used with the bark still on, and then left to dry.
However, not
all willow is good for basket
weaving as sometimes it is very brittle and can snap as
you are
working
with it. If you harvest your own willow you can test to see if it is
any good by bending it and testing its give. If it doesn't and snaps
then don't use it and look for willow that is more pliable.
Willow can also be used
without its bark. It
can be first soaked in water until the summer when it is then used
after the bark has been stripped.
For those of you who like your baskets to have that golden brown appearance the willow used here is boiled first, and then stripped before used.
Cane and Basket Making
Willow is, of course, not
the only material
used for making baskets. One can also use imported materials like cane
which often comes from Indonesia. Unlike willow, which is thicker at
one end than the other, cane
is uniform in diameter from one end to the
other. This makes using cane easier for basketry and is the best
material for beginners to use when first starting off with
their
basket
making.
Basket Making and Storing Cane
If you are not going to use your cane immediately, store it stacked, not in coils as it makes it very difficult to work with it later on. Also make sure that you store it in under cool, dark and dry conditions.
Basket Making and Dyeing Cane
Cane is a very porous material and as a result it is very suitable for dyeing a variety of cheerful and interesting colors. The most successful way to do this is to use fabric dye.
Basic Basket Making Tools
You do not need expensive tools to start making baskets. Nor will you need a lot of tools to do the job. You will need an awl for making holes for inserting the willow, cane or reed, along with a good, sharp pair of secateurs for cutting. You will use a pair of nose-pliers to pinch the reed where you want to bend it at right-angles when making borders. If you don't squeeze it well, when you try and bend it, it will split and break. You will need a tape measure of ruler to measure your work. Finally, if you are working with willow you will need a rapping iron that looks similar to a chisel, but it is blunt and used for tapping down the willow weave into position.
Basic Basket Making
The easiest baskets to make are those that involve using flat reed for the stakes and round reed for weaving.
Take 13 pieces of 3/4 inch flat cane cut at 30 inches, and mark the centers of the flat can on the wrong side.
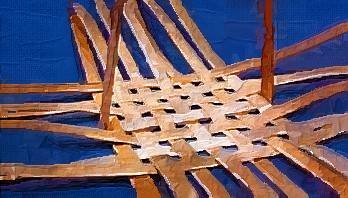
Now, form the bottom of the basket by inter-weaving the flat cane lengths in an under, over pattern with 7 pieces being laid on one direction and 6 pieces laid in the other, making sure that the wrong side is facing up. As you are weaving the 6 pieces, make sure that you insert your wooden handle in the middle of these, so that there are three lengths either side. The handle size ideally should be an 8"x12" D shaped handle with a flat base.
Adjust the weaved pieces on the base to fit 8"x8". Mark these with a pencil so that you know where the boundaries are. Now take a number 2 round reed and weave it in and around the whole base twice to keep it in place. Treat the handle as part of the stakes and hide the twining's ends in between the inter-woven stakes.
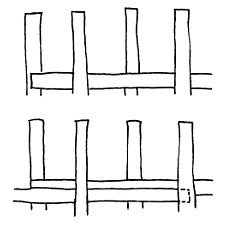
Making sure that the stakes are very damp, gently bring them up into an upright position. Now, using a start-and-stop weave, and using 2 pieces of 1/2 inch round reed cut at 11 inches in length, keep the stakes in an upright position. All weaving now should be showing the right side.
For those of you who are unfamiliar with the term start-and-stop-weave this is when you stagger the start of each row from the start of the last row. Finish the row by overlapping the same weave to the third stave after the start. Overlap the finish of each weave on the outside of the start.
Using 24 pieces of flat-oval reed cut at 38 inches in length, now continue weaving in and out and building your basket. If you have a handle that tapers at the sides, you will have to keep the weaving very tight as you use less and less of the cane lengths as you build your basket. Just make sure that you do this after the first 2 rows, otherwise you will end up with a skew basket!
You may have to start shaving a little off the sides of the stakes as you build past 15 rows so that you go from a 3/4" stake down to a 1/2" stake. You can do this with a pair of secateurs, adjusting the width of the stakes accordingly.
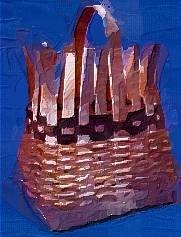
To make your basket more interesting you can add a different color now, 3 rows of brown or blue look good using 1/4 inch flat-oval reed using the same reed color twice. And then add another 3 rows of natural 1/4 inch flat-oval reed as below the dyed area.
Now it is time to tidy up and put on the rim. Cut the stakes so that they are still long enough to fold over and tuck down into the several layers of weave so that they hold themselves in place. This prevents the last row of weave from unraveling and also allows a secure edge to lash the rim to.
A common rim is made by encircling the last wall weave with two reeds or splits, each placed on either side, with the stakes in the middle. This is then lashed and fastened to the basket.
This is done by taking 8 inches of 5 mm binder cane making sure that is damp and supple and lash the rim to the basket. When you come to the handles go around them in a cross-stitch X pattern to strengthen this area. Remember to do this both sides and make sure that the shiny sides are facing upwards.
Did you find this page helpful?
Sharing is a way of saying, "Thanks!"
Follow Us and Keep Up to Date
You can Add your Own Comments and Pages on Basket Making Here!
We have lots of pages where you can contribute to this website, as you can see from our links below. We love hearing from our readers whether you are homesteading at the moment, thinking about homesteading, urban homesteading or just aspiring to country living one day. Wherever you are, we hope you will be one of those we hear from on a regular basis. Look around our homesteading today website. If you have any comments or questions, please feel free to contact us.
Leave a Comment
Do you have anything that you would like to add after reading this page? We would love to hear your thoughts. If you can add additional information to what has been written here you will be adding value to the website! No need to have any special skills - just type and submit. We will do the rest!
NAVIGATION COLUMN
Find us on Google+Country Shopping
Country StoreFree Stuff
Free MagazinesHomesteading Blogs
Country Living Blog Gypsy's WanderingsCountry Living
Country Home Country Living Country Crafts Country HolidaysCountry Real EstateCraft ForumPicnics CampingSelf-Sufficiency
Self-Sufficient Living Organic Gardening Do It Yourself Easy RecipesHomesteading
Homesteading Today Homesteading Q & A Homestead Animals Urban Homesteading Homestead DirectoryGoing Green
Green LivingFarms Around the World
South Africa United Kingdom United States Canada Central America Australia New Zealand Europe Farm Photos Farming Articles True Farming Stories Farms for Sale Organic Farm ProduceMiscellaneous
Guest Book Search Site Survey Advertise with Us


OTHER SECTIONS OF INTEREST
 Country
Crafts
Country
Crafts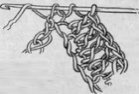 How to
Crochet
How to
Crochet How to
Knit
How to
Knit

New! Comments
Do you have something of value to add? Leave me a comment in the box below.