Growing Mushrooms the Easy Way - A Simple Guide on How to Grow Mushrooms
So what are the basics in mushroom growing? Well you really need the following in a nutshell:
1) An area for growing that can be temperature controlled or fairly static with regards to temperature
2) A container that will include your growing material of straw and horse manure
3) Good, viable mushroom spore
Where to Grow your Mushrooms
Of course we all know that wild mushrooms grow outside. However, when you are growing mushrooms for pleasure or profit you will need to find a dedicated spot for them that will mimick the same growing conditions that the wild mushrooms enjoy.Mushrooms are one of the few plants that don't need light to grow. In fact until the mushrooms are ready to push through the soil, any light would hamper its proper development.
Of course there is an optimal growing temperature for mushrooms and that is between 55-65 degrees F. However, even if your cellar or room has temperatures above or below these ideal temperatures your mushrooms will still grow for you as long as the heat is not at freezing levels or extremely hot.
Once the mushrooms start to pop through the soil they will need some ventilation in their growing areas. We grow our mushrooms in a room under the house and one end backing into the ground. There is a door with a grill area that allows air in and out of the area. This is enough air for this size room. However, the bigger your growing area, the more ventilation you will need to installinstall. Just make sure that you get ventilation into your rooms rather than drafts or blasts of cold air.
Remember you want your rooms to remain at that optimal temperature of between 55-65 degrees F.
What is Mushroom Spawn?
Mushroom spawn is what botanists call mycelium. The spawn is the true mushroom plant and spreads throughout the manure or growing material in which it may be grown. Under ideal conditions these white, delicate mold like threads spread rapidly and in time the fruit which is of course, the mushroom emerges.Once the mushroom grows it produces many spores which, in layman's terms, are the seeds of the plant. However, we have never been able to produce spawn artificially from mushroom spores. So how to we get spawn? By propagation, by division. We take the mushroom plant, or spawn, break it up into pieces, and plant these pieces separately in a prepared bed of mature and other materials, and under conditions favorable for their growth produce mushrooms.
But if we can't produce mushrooms from spore and the spawn in the beds that have borne the mushrooms has died out, how do we get the spawn for future mushrooms?
Mushroom spawn is harvested when it is at its most vigorous condition; just before it starts producing mushrooms. The spawn is then dried and kept for future use.
Good mushroom spawn should smell like mushrooms and the cobweb-like mold should be bluish white and the threads themselves should be a clear white. If the threads are yellow it means that the mycelium has started to grow and then died off.
Compost and Manure for Growing Mushrooms
The type of growing medium you choose for your mushrooms will be determined by what types of mushrooms you want to grow. I grow the brown button mushrooms and like using horse manure and straw as a compost medium as a result. However, if you are growing Shiitake or Enoke mushrooms they like growing in a bran/sawdust mix.The best compost for growing Button or Shaggy Mane mushrooms is from horse manure mixed with straw. I prefer house manure, although donkey manure comes a close second. Some people have had success using chicken manure, I have never tried. But avoid pig, or cow manure for mushroom growing as they tend to introduce the very bugs and beasties you really don't want to have in your mushroom boxes.
Although having said that, I do know of someone who has had success using cow manure. However, it is used dried, chopped up fine, and then mixed with horse manure. The correct ratio is using 2 four-gallon drums of horse manure to 1 straw bale.
The very best manure is that from strong, healthy, hard-worked, well-kept animals that are liberally fed with hard food, as timothy hay and grain, and bedded with straw. And the manure should not only be fresh but it will be better still if it includes some of the straw bedding that has been trampled down in the stables. Remove the manure from the stables on a daily basis and start piling it up for when you will use it.
Tease out the straw from the bales into thick layers of straw and wet it with non-chlorinated water. Cover the straw up with some hessian bags and leave for 3 days to soak and start breaking down.
After day 3 remove the sacks and spread the straw to just a few inches thick before adding a layer of manure. Just a word of warning. Make sure that the horse that you have sourced your manure from has been brought up in organic conditions. If not, any medication or deworming done could affect the manure and in turn your mushroom production.
Continue layering with the straw and the manure until you have run out of material.
You will now need to rot your compost down before you can plant the mushroom spore. And to do that you need to leave your mixed manure and straw for about 5 days untouched. Cover your heap up and leave. On the 6th day turn the heap thoroughly making sure that the outside of the compost is now on the inside. Keep turning it in this way for another 5 days for at least 3 to 4 more time in order for the compost to break down and watch for the temperature of the compost heap to start to drop.
You may need to add a little water to the mixture. However, it must not be saturated and certainly not showing any moisture if you squeeze some of it out. Remember too much water and you will cool down the heat of your compost heap and too much and your compost will sour.
What you do need to watch out for is your compost heap getting so hot that it starts to burn. When hot manure is turned and placed in a loose heap, the pile will heat up tremendously. Sometimes there is so much heat that you will have to turn it again within 24 hours to prevent your heap from burning, which you absolutely don't want. However, with every turning you will be losing ammonia, which is good food for your mushrooms so you really don't want to disturb the manure if you can possibly help it. If you do need to bring down the temperature without losing too much ammonia, then make holes in the compost all over with a crow bar or something similar.
If you plant out your boxes when the compost is too hot, the insides of the beds will dry up and waste the nutrients that would have existed for the mushroom spawn. As a result when the mushrooms do finally emerge the crop will only be a small one and the cropping period will be short.
If you find that your compost has cooled down quicker than you were able to get around to use it, then you can open it up and mix it up with a load of fresh manure and start again so that you get that optimal temperature.
If you are growing mushrooms in horse manure this process will take only 2 - 3 weeks before you have the right compost conditions to start growing mushrooms. But if you are using chicken manure, it can take up to 4 weeks before the compost is ready for growing mushrooms in.
So how do you know when your compost is ready? When the compost is no longer hotting up when it is turned. It should also no longer smell rank. Your compost ready for planting into your boxes should also not be wet. Test it by taking a handful and squeeze it. It should hold its shape and there should be no drips coming from the clump. If it crumbles it is too dry. If there are drips it is too wet.
The compost should measure between 85-90 degrees F. for it to be ready to be spawned. You can spawn the beds at temperatures between 65-100 degrees F. and they will still provide a good crop of mushrooms, but the sweet spot is between 85-90 degrees F.
Sterilizing your Mushroom Compost Growing Medium
If you are growing mushrooms for profit or pleasure sterlizing the compost before planting your spawn is very important. This is because mushrooms are readily attacked by a number of bugs, worms and molds. Therefore by heating the compost up to 200 degrees F for at least an hour will kill off any bugs or mold spores that would likely attack your produce. It also kills off any rogue mushroom or toadstool spawn that may be present.If you are growing mushrooms on a large scale, it is not always practicle to do this, without very expensive equipment. For the smaller mushroom grower one could do this in one's own ovens, but for a larger scale a different method can be used. This is done by allowing your compost to heat up to 170 degrees F. before allowing it to cool down to the 75-85 degrees F. needed for planting.
When is the Right Season for Growing Mushrooms?
Well, there isn't one. You can grow mushrooms all through the year as long as provide the right growing conditions. However, because we live in the northern hemisphere where we get some snow during the winter months we start preparing our manure in July. The boxes themselves are made up in August and we usually have a steady supply of mushrooms from October through to May. After that we find that the mushrooms become infested with fly maggots and so we then place the mushroom compost on to our vegetable garden and start again. We get a steady supply by planting only 2 beds at a time, and then plant another 2 a month later. We do this, planting the boxes every month up to March. In this way we have a successive crop rather than having a flush and then nothing for the remainder of the year.Each bed produces a crop for 7 - 9 weeks until March when the heat brings the flies, and along with them the dreaded maggots. You will find that if you leave your mushrooms growing for longer than 9 weeks, despite the compost being pretty much depleted you will still get mushrooms popping up weeks later, but the main flush is really over after 9 weeks, and so not worth keeping them going beyond that.
Preparing your Boxes for Growing Mushrooms
Once your compost is ready place the compost into wooden boxes that are between 6 and 8 inches deep. You need good circulation around your boxes so make sure that the last box is at least 6 inches off the floor of the building and if you are stacking the boxes that there is at least 2 feet between the bottom of the 2nd box and the top of the last box. This allows you a good space to work with the mushrooms when harvesting them, as well as emptying the soil out when you want to start again with another batch.Once you place your compost into the boxes make sure that it is not too compacted although you don't want large air pockets, either. You want the compost to be springy. You don't want the compost to be just a wet, soggy mess. Do not fill to the top of the box as you will need to leave a few inches so that you can then add the spawn and more sterilized compost on top of that for cover.
Now taking a thermometer place it into the soil and leave it there for 3 days.
Take your mushroom spawn and cut it up into inch x inch pieces. If it is fresh there will be a white, fluffy layer on the top and it should have a mushroom smell. Avoid any mushroom spawn that is black or dark green in color.
Now place the spawn pieces into an inch of peat moss, medium loam soil or more of your compost. Plant them into holes 8 inches apart. Others like to crumble the spawn into the soil and then cover it with an inch of loam soil. If the mycelium looks really good, then you can plant the pieces 10 inches apart. If your compost is in the 70s with regards to temperatures, then it is better to bury the pieces of spawn a little deeper into the soil to get the benefit of the maximum of warmth.
Better results are also obtained when the soil is inert as it encourages the spawn to spread rather than to grow up. Inert soil can be created by heating it up or taking bare ground and burning paper on the top of it.
Add a little lime to the soil as this will further help with growing mushrooms successfully.
Sometimes, you will find that there is a lot of moisture that collects on the roof of the place where you are growing your mushrooms which happens to then drip down on to your beds. This is something you really don't want and so if you do find this happening, you can place a layer of straw on top of your beds which will then absorb the moisture and the drips.
Casing and Mycelium
The mycelia grows from the spawn once it is active in white, furry threads that can be seen under the soil if you move it. However, fruiting of your mushrooms doesn't seem to happen until casing takes place. This is when you place a layer of unsterlized soil on top of your mycelia threads that then encourages your mushrooms to start popping up. If you find that your mushrooms start coming through without casing taking place, then there is no need to do it. In fact if you did place soil on top of the little pin heads appearing, which is the start of your mushrooms you will damage them.The correct way for casing to take place is to place 1 1/2 - 2 inches of loam or clay loam soil that is free from compost or rotted down material. Sandy soils don't work, so make sure that it is loam that you choose. If you don't add at least a couple of inches as a casing your mushrooms will come up quite weakly and won't crop for long.
Casing is done about 10 - 14 days after you have planted your mushroom spawn. It should definitely be down before the mushroom heads start to appear. If you do the casing as soon as you spawn the beds you will run the risk of heating up the compost mix too much, which will then kill the spawn and you will not get any mushrooms. Casing too late, and you will damage the mycelia and again, spoil the crop.
Make sure that your soil is moist, but not wet. Then firm it down just so that you are making sure that there will be good contact and no air pockets.
I add a layer of straw over the casing at this stage to make sure that the moisture is kept in. However, just before the pin heads appear, the straw is removed. This mulch is then sprayed lightly every few days so that the water moistens the straw but the water never reaches the soil.
Optimal Cellar Temperatures
The ideal room temperature is fairly constant at 55 - 57 degrees F. This is the temperature we aim for in our cellar. However, there are other areas where mushrooms are grown and so you have to look at these structures too and people have had success in growing mushroom in temperatures ranging from 20 degrees F. to 65 degrees F. If you have a room that has a very low temperature you can compensate by placing a layer of straw on top of your boxes to try and maintain the heat a much as possible.If you have very high temperatures in your growing area, the mushrooms will not grow well at all. As far as I am concerned, 65 degrees F. is far too hot. What happens in hotr temperatures is that the mushrooms will be forced to emerge early, resulting in weak fruit, with thin flesh and long stems that soon exhausts the compost.
In a room temperature of 55 degrees F. it may be up to 7 weeks after spawning before the mushrooms start to emerge. If the temperature is 5 degrees lower than this it will take another couple of days before the pin heads start to emerge. However, when they do they are strong, firm, short stemmed fruits that are a little furry on the top and a little clammy to the touch. Beds at this temperature will produce for at least 2 months.
If you find that the room temperature is too cold, you can heat the area up by placing piles of fresh horse manure on the floor area. Heat can be retained by turning these piles over periodically and replacing with new piles from time to time, once the core temperatures of the piles begin to drop.
If you find that the temperatures of the beds themselves have fallen below 57 degrees F. and the atmospheric temperature is under 45 degrees F. then covering the beds with a thick layer of straw at this stage to keep the beds warm.
Moisture can be retained too by misting the floors and walls of the cellar regularly.
Growing Mushrooms and Watering
The ideal situation is that you should never have to water your beds from start to finish. The only time you should have dryness would be in the loam casing layer. However, we all know that ideal situations don't always exist, and so there will probably be times when you will have to water your crop. This is especially true if your rooms are artificially heated. However this should be done very carefully.Once you have planted your spawn and covered them up, you can water lightly if you want to, but this is the last time that you should be watering for 4 weeks. Water should never be given to your mushrooms in the first 4 weeks as there is enough moisture in the provided compost. If you end up over-watering your mushrooms they will die. They like moist or damp conditions, but not sodden ones. If at any time you need to water, the water should be non-chlorinated water that is at luke-warm temperatures; 80-90 degrees F. is good, but never higher than 110 degrees F.
What I do, once I have covered up the spawn is to take a sprayer and lightly spray the soil. In this way, I am not watering, in the true sense, but rather just misting the soil so that there is now water in the soil that will help to start off the spawn.
If you are growing mushrooms in temperatures above 60 degrees F. then you should start watering lightly after the 4 week period. If your temperature is below this, then you should delay watering for another 2-4 weeks. Here again, I use the term "watering" losely, as really you want to be spraying or misting, rather than watering.
If you find that your soil is drying out too quickly then you can solve this problem by spraying and then placing a damp Hessian sack over the top of the boxes while you are waiting for the fruits to start showing.
If you find that the soil is drying out while your mushrooms are appearing, watering doesn't harm them at this stage but just make sure that it is just a sprinkling. Don't water more than necessary and certainly don't allow water to pool any where. The water should be soft, and clean.
Death to your mushrooms will come swiftly if you allow the soil to dry out, so make sure that this never happens. Overwatering has the same results.
Mushroom Cultivation
 After planting the mushroom
spawn if all conditions are met, you should start to see
white pin heads starting to emerge. This is the beginning of your
mushroom crop. However, it really does depend on the conditions of your
compost, room temperature, etc. and it can even take more than 10 weeks
to appear. After 7-10 days of growth the
mushrooms are ready to be
harvested.
After planting the mushroom
spawn if all conditions are met, you should start to see
white pin heads starting to emerge. This is the beginning of your
mushroom crop. However, it really does depend on the conditions of your
compost, room temperature, etc. and it can even take more than 10 weeks
to appear. After 7-10 days of growth the
mushrooms are ready to be
harvested. During the growing period you will have to pick over your beds looking for any "fogging" in mushrooms. These are mushrooms that have gone soft. You also need to remove old mushroom stems, or spongy material attached to these. Fill up any holes caused by their removal and place a small amount of sifted loam over the area recently worked on. Don't bury the new pin heads and don't firm down any soil at this stage as you are likely to do more harm than good. As any injury at this stage to the pinheads will result in more "fogging".
If you find that some of your mushrooms have been affected by black spot, you can again treat them by sifting a layer of loam soil over the beds. This seems to prevent a complete outbreak and often protects the mushrooms that haven't appeared as yet, although it will do nothing for the mushrooms that have already been affected.

Feeding your Mushrooms
If you want to feed your crop you can use a fairly strong horse manure liquid as a fertilizer made from fresh horse droppings steeped in water, but don't spray on it on your mushrooms as they will stain. You can apply it to the beds using a watering can with a long spout. This will feed your mushrooms during their growing time. But only apply once, and sparingly.
Dump 2 bushels of horse manure into a 45 gallon drum. Fill the drum up with water, stir well and allow the dung to steep overnight. The following day drain off the liquid and to this add 1 lb saltpeter. Now use the liquid by diluting 1 bucket of the manure water with 1 bucket of warm water. Saltpeter is an excellent fertilizer for mushrooms.
You can use saltpeter in 2 ways:
1) Either as a fertilizer used in the casings. This used dry and is mixed directly into the casing loam at rate of 2 ounces saltpeter to 1 bushel of loam.
2) Diluted with water at a rate of 2 ounces of saltpeter to 8 gallons of water. Sprinkle over the beds.
Common salt can also be used as an insecticide as well as a fertilizer. It can be either broadcasted onto the beds - always on the bare parts - never touching the mushrooms. Leave it for a day or two and then water into the soil. This helps destroy the anguillulae.
If you are using salt as a fertlizer you must dissolve 4 ounces of salt into 10 gallons of water and use this to sprinkle over the beds.
When to Harvest Mushrooms
Mushrooms can be harvested when they are just new and plump, for the commercial market, of for home use when they have passed this stage when the cap is flattened out as they are more flavorsome. When you are harvesting new mushrooms make sure that you do so just before the frill breaks away from the stem.Of course you could leave your mushrooms to mature a little longer if you want a stronger taste and to actually open up rather than harvesting them as babies. It is just a matter of taste and what your market demands.
When you want to harvest them it is better to pull them out by the roots, rather than cutting them. This is done by taking hold of the mushroom, pushing down slightly and giving it a sharp, but gentle twist. They generally come out with no trouble. Place the mushrooms stem side down into the baskets to keep them clean and free of grit.
If you find that in trying to harvest one mushroom you would end up pulling up several that are attached to the same rootstock, then it would be better to cut these off, rather than twisting them.
Advantages of Pulling rather than Cutting Mushrooms
- It benefits the bed. Cutting mushrooms can often cause the stems to decay. They turn soggy and end up destroying the little pinheads surrounding the cut stems, as well as every thread of mycelium attached to it. It is important therefore to scoop out the cut stems where you have been forced to cut, and then replace the empty areas with more soil.
- Pulled mushrooms always keep fresher for longer.
- As mushrooms are sold by weight, the added stems adds to
your profits.
Insects and Diseases when Growing Mushrooms
Like growing any crop there will always be insects or diseases lurking that will need to be dealt with. And mushrooms have their fair share, namely:- Maggots
- Manure Flies
- Slugs
- Mites
- Rats
- Toads
- Woodlice
- Black Spot
- Fogging Off
- Flock
Mushroom Pests:
1) Maggots: This is the fly larvae that comes from the Diptera fly that appears in April and continues up to the warm summer months. Maggots are unavoidable and the only solution is to stop growing mushrooms during the summer months. If left you will see the burrows left behind by the maggots, as well as the infested mushrooms where the maggots can be found in the caps and the stems. By August, September the maggots are on the decrease and during the month of October, they stop completely.A solution of salt, saltpeter, or ammonia sprinkled over the surface of the bed does not do any good as an insecticide against these maggots. The only solution is to stop production until the maggots have gone and then start again.
2) Manure Flies: These are little flies that appear in large numbers in the spring and summer. They will appear anywhere where you find manure. Although you can set up some fly traps, again it is better to suspend production during the summer.
3) Slugs: These mushroom pests seem to gravitate to areas where you have had the crop growing in wooden boxes, or where straw has been used to cover the soil. Slugs will attack the pinheads as they are just emerging, to the adult mushrooms. They are also rather fond of eating pieces out of the gills.
3) Mites: Although you will find 2 lots of mites around mushrooms, neither of them seem to damage the crop in any way. There is the white mite which is a little smaller than the red spider mite, and then there is a yellow mite that is as large as the red spider mite.
4) Rats: Both rats and mice will cause a lot of damage to your crop if they get the chance. The remedy is to make your rooms as mouse-proof as possible and set traps down on the floors wherever possible.
5) Toads: Because of the warm, moist conditions toads can sometimes be found amongst the compost. Some mushroom growers don't see toads as pests as they certainly help keep the fly population down. However, there are others who get rid of them as soon as they arrive as they can do a lot of damage to the crop where they destroy a lot of the pinheads when they burrow themselves into the soil.
6) Woodlice: The conditions within a damp cellar, with moist compost in wooden boxes and straw is the ideal habitat for woodlice. Unfortunately, they eat little chunks out of the pinheads and small button mushrooms and these bitten areas only get bigger as the mushrooms grow. The only way to get rid of the woodlice is to trap them and then kill them.
To do this, take a half-boiled potato, boiled in plain water without salt, and then cover the potato with either some straw or some dry moss. This forms a mini-habitat for the woodlice and they can be found eating the potato if you lift the moss or straw. Drop these caught woodlice in water with some kerosene in it.
Mushroom Diseases:
1) Black Spot: This is a disease that disfigures the mushrooms, where dark brown spots, streaks or freckles form on top of the mushroom caps, and they become more prominent as the mushroom gets bigger.Black spot is caused by eel worms (anguillulae) where these minute creatures enter the mushrooms when the latter are in their tiniest pin form and before they emerge from the ground. If you find one mushroom in a clump with black spot, you will usualy find that every mushroom in the clump has it. However, there are others growing from the same spawn that come up an inch or two away from the spotted, infected ones, and they can be completely clean.
In general, black spot occurs in mushroom beds that are not new, but appears in those boxes that have been bearing for some while. Between October and March, we have very little black spot. However, as soon as spring comes around, this disease becomes a problem and continues into May before production is closed for the summer months.
The way to prevent black spot is to make sure that every bit of the old stumps are removed when harvesting takes place. All fogged off mushrooms have to be removed as soon as they are found, and keep the holes filled with fresh loam, and when the beds have been bearing for 2 weeks, sprinkle it over with a solution of salt. On the next day, topdress with a half inch of finely sifted fresh loam; firm down with the back of your hand, just so that you don't do any damage to the growing mushrooms.
2) Fogging Off:
At times you will find clumps of mushrooms will go soft and turn brown, and became shrivelled. A common reason for fogging off is when mushrooms are cut rather than twisted during harvesting and the stumps are left in the ground. In a few days these stumps develop a white fluffy substance which seems to kill of every thread of mycelium leading to it, along with all the mushrooms conntected.
Insects that do damage to the mycelium threads can also cause fogging off.
3) Flock: This is the worst of all mushrooms diseases. Flock is caused by other fungi which infest the gills and frills of the mushrooms, and leave them with a hard, flocky mass, and sometimes distort the shapes of the cap.
Flock can appear spasmodically, and doesn't seem to spread in clumps like black spot.
The only way to get rid of flock is to remove and destroy every clump of mushrooms that are affected. Keeping the growing areas clean, and giving the rooms a good cleaning after the growing season and preparing for the new season, is important.
Cleaning your Mushrooms
Mushrooms should never be washed. They will absorb the water like a sponge and spoil. Instead the soil should be cleaned off with a soft brush. If you are not able to clean them this way, you can peel the mushrooms before you cook them.Cleaning the Boxes for the Next Mushroom Growing Season
After the growing season you need to clean not only the boxes but also the room; floor and walls and all shelving in preparation for the next growing season. Scrub and clean the wood in hot water and a mild bleach solution. Whitewash the walls to make sure that you have a clean area to grow in again. Paint the shelving with kerosense is also advisable.Do you have Something to Share on Growing Mushrooms?
We have lots of pages where you can contribute to throughout this website. We love hearing from our readers, and hope you will be one of those we hear from too. Look around our homesteading website. If you have some comments, tips and ideas on growing mushrooms of your own, please submit them. All you need to do is type and submit. We will do the rest! If you have some pictures of your own designs we would love to see them!
Leave a Comment
Do you have anything that you would like to add after reading this page? We would love to hear your thoughts. If you can add additional information to what has been written here you will be adding value to the website! No need to have any special skills - just type and submit. We will do the rest!
Other Comments
Click below to see comments from other visitors to this page...
Your Mushroom Growing Info is very helpful. 
I am planning to grow Oyster Mushrooms, Button Mushrooms and Shiitake mushroom for commercial purposes.
However, I don't have time to make our own …
Don't miss out on our latest news and articles. Sign up for our free monthly e-zine!
Go from Growing Mushrooms back to Grow Vegetables


OTHER SECTIONS OF INTEREST
 Horse
Manure
Horse
Manure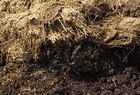 Manure
 Self
Sufficient Living
Self
Sufficient Living Grow
Vegetables
Grow
Vegetables
New! Comments
Do you have something of value to add? Leave me a comment in the box below.