Instruction on How to Carve a Pumpkin in 5 Easy Steps
Learn how to carve a pumpkin for that special country Halloween. Carving Halloween pumpkins is an old tradition that is easy to learn how to do. Just follow our step-by-step instructions.October wouldn't be October if we ignored Halloween altogether. It was never part of my childhood growing up, but my kids used to enjoy dressing up and going "trick or treating" when they were small, and we still light the candle in the ceramic pumpkin every year and place it on the garden wall.
If you are celebrating Halloween and haven't carved a Halloween pumpkin before, now is the time to learn. It is fairly straight forward, and if you want to get a little fancy one can now buy stencils for some beautiful Halloween pumpkin carving.
HOW TO CARVE A PUMPKIN and Step 1 in Choosing your Pumpkin
Pumpkin Carving is your next step closer to creating your perfect Country Halloween. Pumpkins come in all shapes and sizes and the one that you choose for your carving will depend on the shape and size of your design. So know what you are going to carve, and then buy your pumpkin accordingly. Get your pumpkin home and clean it with a damp cloth.HOW TO CARVE A PUMPKIN and Step 2 in How to Scoop Out the Flesh
For those of you who want to leave the top of the pumpkin intact along with the stem, then you will have to make an opening at the back of the pumpkin instead where you will scoop out the flesh. However, if you want to take the top off, slice off just a small amount with the stem and scoop out the seeds and fibrous material going in from the top, using a serrated spoon or an ice cream scoop. Take enough flesh away so that you have about a one inch depth of the flesh to work with.HOW TO CARVE A PUMPKIN and Step 3 in How to Flatten the Bottom
Once it is clean and free of seeds, make sure that you have a flattened area at the bottom of the pumpkin inside where you can place your candle. This can easily be done by scraping out the middle in a way that ensures a flat surface for the candle to rest on.HOW TO CARVE A PUMPKIN and Step 4 in How to Sketch your Design
Now take a marker and start sketching your design. If you prefer, you can sketch the design on paper, and then tape the sketch to the pumpkin.HOW TO CARVE A PUMPKIN and Step 5 in Starting your Pumpkin Carving
Now take a metal skewer and trace your pattern by making holes with the skewer along the drawn outlines. Once you have the dotted outline in place you can then start carving it out with a sharp knife.ADVANCED HALLOWEEN PUMPKIN CARVING - Shading Pumpkins
Learning how to carve a pumpkin using shading for pumpkin carving is a very different technique. Shading is when you don't just cut holes in the pumpkin but you also strip some of the skin away revealing the flesh, and other parts of the pumpkin you leave natural. By employing this technique you can make some spectacular pumpkins.
The tools you will need for shading are your common old kitchen knives and also some small chisels and pottery tools for peeling the pumpkin skin away. However, if you don't have these at hand, use a screwdriver, this works just as well.
When you peel the pumpkin you want to get the effect of this with the correct lighting, so whatever you peel should be to a depth of a half inch. Those parts that are cut away completely will give you your candlelight shining through, the peeled areas will give you an opaque effect and the natural skin left behind will be your dark shadows.
Have a look at the pictures below. Hopefully they will give you some inspiration for your next Halloween pumpkin carving project, and perhaps you can show someone else how to carve a pumpkin!

Pumpkin Carving Ideas
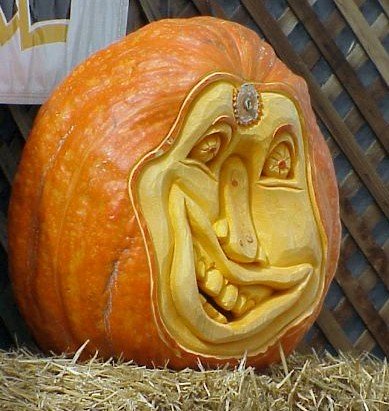
Pumpkin Carving

You can Add your own Comments, Tips and Ideas on How to Carve a Pumpkin for Halloween here!
We have lots of pages where you can contribute to throughout this homesteading website. We love hearing from our readers, and hope you will be one of those we hear from too. Look around our homesteading website. If you have some comments, tips and ideas on how to carve a pumpkin of your own, please submit them. All you need to do is type and submit. We will do the rest!
Leave a Comment
Do you have anything that you would like to add after reading this page? We would love to hear your thoughts. If you can add additional information to what has been written here you will be adding value to the website! No need to have any special skills - just type and submit. We will do the rest!
Don't miss out on our latest news and articles. Sign up for our free monthly e-zine!


OTHER SECTIONS OF INTEREST
 Country
Living
Country
Living Country
Home
Country
Home Pumpkin
Recipes
Pumpkin
Recipes
Country Crafts
New! Comments
Do you have something of value to add? Leave me a comment in the box below.