How to Make Lye for Natural Soap Making from Wood Ash
We show
you how to make lye which is perfect
for making
natural soap including some old, pioneer soap recipes. It isn't
difficult, although if you have access to
commercial lye, you may prefer to use that instead. This is because
commercial lye will give you consistency in your lye soap
recipes. However, if you live in an area where it is difficult to
source, and you have the right wood available to you, then you can
follow these steps to making your own lye.
You can also make your own lye using slaked or unslaked lime. See
recipes for these below.
The problem with making lye from wood ash, although it is a simple process, the end result can be that your lye water is either too strong, or too weak. Either way, it could spoil your batch of homemade soap.
Having said that, none of our ancestors had access to commercial lye and they made soap just fine. We will also give you a couple of tests to do that will take a lot of the guess work out of the process, making sure that your lye is of the right strength.
What is Lye?
Lye is a strong alkali that is used in soap making, among other things. It is also known as caustic soda or sodium hydroxide.Lye Ingredients
The ingredients for making lye are wood ash and water. Preferably rain water, as it is soft, although tap water will work just as well. The ash should come from hardwoods as soft woods are too resinous to mix with fat.
Wood for Making Lye
- Applewood
- Ash
- Aspen
- Australian Red Cedar
- Beech
- Birch
- Buckeye
- Cherry
- Chestnut
- Elm
- Hickory
- Oak
- Olive
- Sugar Maple
- Walnut
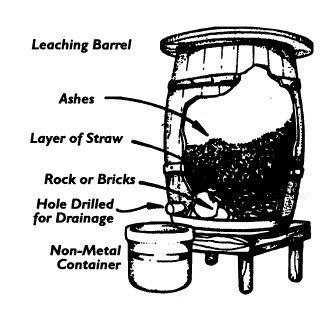
Traditional Method of Making Lye using a Wooden Barrel
Place a bung in any existing opening in the wine barrel, and drill a smaller hole into the barrel that is only 1/8th inch wide. What you are aiming for is a hole wide enough for the water to drip through but small enough for the ashes not to fall out. Keep this hole closed up with a small bung until later.
Now pack the bottom of the barrel with clean river stones. Make sure that you get a good mix of both large and small stones as this will work as a filtration system. If you don't have stones, you can also use a thick layer of charcoal instead.
After a good layer of stones you will need to place a generous layer of straw on the top of the stones. Your straw should take up at least half way up the barrel.
Shovel in your ashes until the barrel is as full as you want it. After that, pour over some hot rain water in small amounts so that the whole contents are wet and soaking but not flooding. Using hot water is important as the hot water will draw out more potash from the wood ash than cold water, making your lye stronger.
Traditionally, a little lime was mixed with the ashes to 2 - 5% which then guaranteed that you would have good lye for soap making.
On day 2 you can add more ash and water after allowing the ash from the previous day to settle.
Countryfarm
Lifestyles Tips:
|
On day 3, make sure your receptical is ready under the opening on the barrel, remove the bung and wait for the lye water to slowly trickle out.
At this stage you need to get it to an even strength to use for your soap making. Boil this liquid again until you are able to do the "float test" and get it to work. See instructions below.
How to Test the Strength of your Lye
To make lye and be successful at soap making your lye has to be at the right strength. Now there are 2 ways in which this can be done, both of which indirectly involve chickens. If you live on a farm and keep chickens, then this test is fine for you. If not, then you can use the second test.
Test 1
This is a simple test. Take a chicken feather and place it in the lye. If the feather dissolves, the lye is strong enough and you can use it for your soap. If not, you will have to re-boil the lye water when it emerges and repeat the process until your chicken feathers dissolve.
Test 2
This test involves using a fresh, whole egg or a potato works just as well. Take the egg or potato of similar size and place it in the cold lye water. If it sinks, your lye is not strong enough and you will have to repeat the process until it does.
If the potato floats with just a little of the lye water above it; about an inch showing above the water, or the head of the egg sinks to just half-way down, then the strength is just right. If the potato or egg floats too high, almost on top of the lye water, then the strength is too strong. You can compensate by adding a little bit of fresh water to the lye water and try again.
With the first test, I would still back this up with the "egg floating" test, just to make sure that my lye water was not too strong.
Modern Method of Making Lye using A Plastic Bucket
Traditionally, as you have just read, people used wooden buckets or casks lined with straw and small rocks to make lye. Now, not everyone has access to these things, so I am going to show you how you can make lye just as easily in an old nappy bucket or something similar.Take your old plastic nappy bucket and drill a neat round hole, about an inch off the bottom on one side of the bucket. It shouldn't be very big, about the diameter of a small iron nail - about 1/8th of an inch. Make sure that the size of the hole is the same size of the nail that you will use to stop up the hole when needed.
Boil water half of the capacity of the bucket and pour gently over the ashes. As soon as the water makes contact with the ash it will start hissing and bubbling. This is perfectly normal.
You may find at this stage that the water is just sitting on top of the ash, without it appearing to do anything. Just leave it, without disturbing it, and come back later to see when you can add the rest of the water.
Once you have used all the water elevate the bucket so that you are able to place a glass or plastic container under the hole that you previously drilled and stopped up with a nail. Place your receiving container under the hole and remove the nail. Do not expect lye water to come out of here. This could take hours, if not days.
Once you have enough lye water use the nail to stop up the hole. Take the lye water to the kitchen and boil carefully.
Take care at this stage as the lye is caustic and if it splashes onto your skin and into your eyes it will burn. You will need ot wear gloves and safety glasses at this point.
Once you have heated up your lye water take it back to your bucket and carefully pour it back over the ashes in the bucket. This helps strengthen the lye.
Wait for the lye to emerge once again.
Drying Lye to Form Crystals
When you buy commercial lye it is in the form of crystals. When you make lye at home you will want your lye to be in crystals too. This is very easy to do. Take your lye water and place it in the sun until the water has evaporated. What you are left with are your lye crystals that you can use quite happily in your soap making recipes.
How to Make Lye using Unslaked Lime (Calcium Oxide)
Unslaked lime is a chemical compound known as calcium oxide and also known as lime or quicklime.Recipe 1:
Put a half pound of unslaked lime into 2 gallons of water. Add 6 pounds of washing soda and boil gently for 1 hour or so. When cold, pour off the liquid part which is your lye.Recipe 2:
Take 10 quarts water, 6 pounds quicklime, (shell lime if possible), and 6 pounds of washing soda. Boil for 1 hour or so. When cold, pour off the liquid which again is your lye.How to make Lye using Quick Lime (Calcium Hydroxide)
Calcium hydrixide is a chemical compound known more commonly as slaked lime. It is formed when calcium oxide is mixed with water.Put 3 pounds of washing soda, 3 pounds of slaked lime, and 12 quarts of water into a large pot. Boil for 20 minutes. Wait for the contents to cook, and when cold, pour off the liquid part which is your lye.
How to Use Homemade Lye in Soap Recipes
In the end your homemade lye is softer on the skin. It is potassium hydroxide as opposed to sodium hydroxide. When following soap recipes make sure that you use the right type of hydroxide, as although both are lye, they cannot usually be used in place of the other in certain recipes.
The potassium hydroxide molecules are larger than the sodium hydroxide molecules. It is this size difference that enables the potassium hydroxide to maintain a liquid state.
Potassium hydroxide is normally used to make liquid soaps. And when our ancestors made soap using homemade lye, most of the time they ended up with liquid soap because the lye they were using wasn't strong enough.
However, you can make a hard soap by adding common salt at the end of the boiling process. If you want to add salt to harden your bars of soap, weigh out the water you are going to mix your lye with.
Before you add the lye, add ½ tsp. of salt per pound of oil/rendered fat in your recipe. Stir well to make sure that all of the salt is dissolved. Add your lye to the salted water, making your lye solution, and resume your normal soap making procedure. Both types of hydroxide, however, are extremely corrosive and must be handled and stored with care.
The traditional ratio is 2 pounds fat or grease (such as bacon fat) to 1 gallon homemade lye.
Natural Soap Recipe using Homemade Lye
Here is an original pioneer soap recipe using your homemade lye water.Ingredients:
2 pounds fat1 gallon homemade lye water
2 tablespoons white vinegar
1/2 cup hot water
Method:
If at this stage you want to use it was soft soap it is ready after straining through several layers of cheesecloth before placing in storage containers. 1 cup of homemade liquid soap per load is all that is needed.
If you want hard soap you will need to add 1 teapoon salt dissolved in a little water to the mixture at this stage and boil for longer. Skim the foam off the top and place the liquid into molds and allow to set.
Another Pioneer Soap Recipe using Homemade Lye
Fill a pot 2/3rds full of homemade lye. Place on the stove over a medium heat and ladle in ladlefuls of melted lard and stir until your mixture is creamy. Now add handfuls of salt to the mixture and stir until a ring of soapy mixture is left behind and very evident on the stiring spoon.Remove from the heat and allow the soap to harden. After it has hardened you will need to drain the remaining lye water off the soap.
You can make soft soap in the same manner if you don't add the salt at the end of the process.
Visit our Making Soap page for more information on how to make soap at home. You will also find Soap Recipes for the three main types of soaps; hand-milled soaps where you do not have to use raw lye, cold process and hot process soaps.
Other Resources on Soap etc. that you May be Interested In
Go from Lye from Wood Ash to Soap RecipesGo to Homemade Laundry Soap Detergent
Go to the Saponification Chart
Go to Traditional Skills
Go to Country Living
Go to Self Sufficient Living
Buying Lye off the Internet
If you can't be bothered to make lye the old-fashioned way then perhaps you may be interested in purchasing these products through our partner Amazon.comDon't miss out on our latest news and articles. Sign up for our free monthly e-zine!
Go to Countryfarm Lifestyles and Homesteading


OTHER SECTIONS OF INTEREST
 Making
Soap
Making
Soap Soap
Recipes
Soap
Recipes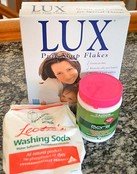 Homemade
Laundry
Homemade
LaundrySoap
 Saponification
Chart
Saponification
Chart
New! Comments
Do you have something of value to add? Leave me a comment in the box below.