Growing Grapes and
Pruning - A How to Guide with Images and Instructions
One of the surest of fruit crops is the grape, a crop each year being reasonably certain after the third year from the time of setting the vines; and the good amateur kinds are numerous.
When looking at growing grapes, the grape does well on any soil that is under good cultivation and well drained. A soil with considerable clay is better under these circumstances than a light, sandy loam. The exposure should be to the sun; and the place should allow cultivation on all sides.
Growing Grapes and Pruning Grapes
The planting hole in which the plant is to be set should be large enough to allow a full spreading of the roots. If the season is dry, a mulch of coarse litter may be spread around the vine. If all the buds start, the strongest one or two may be allowed to grow. The grape canes arising from these buds should be staked and allowed to grow through the season; or in large plantations the first-year canes may be allowed to lie on the ground.
In the second year of growing grapes, one cane should be cut back to the same number of eyes as the first year. After growth begins in the spring, two of the strongest buds should be allowed to remain. These two canes now arising may be grown to a single stake through the second summer, or they may be spread horizontally on a trellis. These are the canes that form the permanent arms or parts of the vine. From them start the upright shoots which, in succeeding years of growing grapes, will bear the fruits.
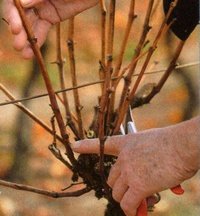
When
pruning grapes choose
4 strong canes for next season's crop.
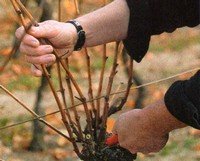
Cut
off all other canes.

Of
the 4 canes remaining now choose 2 that are the strongest and cut off
the other 2.

Now tie the 2 canes to the trellis wire. You may need to tie them down.
In order to understand the pruning of grapes, one must fully grasp this principle: Fruit is borne on wood of the present season, which comes from wood of the previous season.

To illustrate: A growing shoot, or cane, of 2010 makes buds. In 2011 a shoot arises from each bud; and near the base of these shoots the grapes are borne (1 to 4 clusters on each).
While every bud on the 2010 shoot may produce shoots or canes in 2011, only the strongest of these new canes will bear fruit. The skilled grape-grower can tell by the looks of his cane (as he prunes it in winter) which buds will give rise to the grape-producing wood the following season. The larger and stronger buds usually give best results; but if the cane itself is very big and stout, or if it is very weak and slender, he does not expect good results from any of its buds. A hard, well-ripened cane the diameter of a man's little finger is the ideal size.
Another principle when growing grapes and pruning that needs to be mastered is this:A vine should bear only a limited number of clusters, - say from 30 to 80. A shoot bears clusters near its base; beyond these clusters the shoot grows on into a long, leafy cane. An average of two clusters may be reckoned to a shoot. If the vine is strong enough to bear 60 clusters, 30 good buds must be left at the pruning (which is done from December to late February in the northern hemisphere).
The essential operation of pruning grape vines, therefore, is each year to cut back a limited number of good canes to a few buds, and to cut off entirely all the remaining canes or wood of the previous season's growth.
If a cane is cut back to 2 or 3 buds, the stub-like part which remains is called a spur. Present systems, however, cut each cane back to 8 or 10 buds (on strong varieties), and 3 or 4 canes are left, - all radiating from near the head or trunk of the vine.
You will notice when growing grapes that the top of the vine does not grow bigger from year to year, after it has once covered the trellis, but is cut back to practically the same number of buds each year. Since these buds are on new wood, it is evident that they are each year farther and farther removed from the head of the vine.
In order to obviate this difficulty, new canes are taken out each year or two from near the head of the vine, and the 2-year- or 3-year-old wood is cut away.
Growing Grapes and Training Grapes
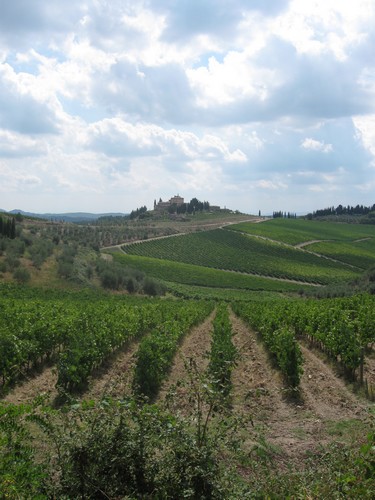
Growing grapes in Italy is a major part of the agricultural industry
On arbors, it is best to carry one permanent arm or trunk from each root over the framework to the peak. Each year the canes are cut back to short spurs (of 2 or 3 buds) along the sides of this trunk.
When growing grapes they are set from 6 to 8 feet apart in rows which are 8 to 10 feet apart. A trellis made of 2 or 3 wires is the best support. Slat trellises catch too much wind and' blow down. Avoid stimulating manures. In very cold climates, the grape vines may be taken off the trellis in early winter and laid on the ground and lightly covered with earth. Along the boundaries of home lots, where grapes are often planted, little is to be expected in the way of fruit because the ground is not well tilled.
Growing Grapes and Diseases
Unfortunately growing grapes means also fighting against disease. The grape is subject to many insects and diseases, some of which are very destructive. The black-rot is the most usual trouble.To produce bunches of high quality and free from rot and frost injury, grapes are sometimes bagged. When the grapes are about half grown, the bunch is covered with a grocer's manila bag. The bags remain until the fruit is ripe. The grapes usually mature earlier in the bags. The top of the bag is split, and the flaps are secured over the branch with a pin.
Now that you know how to grow grapes, learn how to make wine and use our homemade wine recipes.
Don't miss out on our latest news and articles. Sign up for our free monthly e-zine!


OTHER SECTIONS OF INTEREST
 Natural
Pesticides
Natural
Pesticides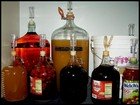 How to
Make Wine
How to
Make Wine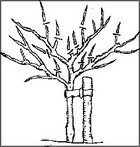 Planting
Pruning Fruit Trees
Planting
Pruning Fruit Trees Neem
Thumbnail
Neem
Thumbnail Grow
Vegetables
Grow
Vegetables
Self Reliance
New! Comments
Do you have something of value to add? Leave me a comment in the box below.