How to Make Bread with Step-by-Step Instructions and Recipes
I first started making bread at the age of about 14 following a recipe that unfortunately was not accurate. When it came to proving the dough the recipe, instead of reading "put it in a warm place" as it should have done, it read, "put the dough in a cool place". Never having made bread before, and doing it on my own, I didn't know any better, so put it in the fridge.
Of course the bread dough didn't rise, and so I left it overnight, thinking that time would help. It didn't! Then I thought, well perhaps the bread will rise after I put it into the oven. So in the bread dough went, still flat. Well, when it came out of the oven it remained flat and you couldn't even get a knife through it! My father very dryly commented that perhaps I could submit it to our local brick and tile factory as a new prototype for bricks!
I have been making bread now for the last 30 years and so pass on my bread making tips to you.
Once you know how, then try our bread recipes and tell us about your experience.
HOW TO MAKE BREAD: GENERAL INSTRUCTIONS
HOW TO MAKE BREAD - YEAST
The most convenient and easiest to obtain, these days, is dried, instant yeast. It comes in either tins or sachets as granules. Plain dried yeast is better than that specified for bread. The latter is often expensive, and you have to use more of it.
When buying yeast, check the 'use by date' as if you use old yeast that is not fresh your bread will not rise. After opening, you may keep your dried yeast in an air-tight container in the fridge, or even in the deep-freeze if you are not going to use if for a while. However, if you do this, make sure that the quantity of yeast that you have taken out for use for your next batch of bread is brought to room temperature first, before you use it.
We have some bread making tips for you below on how to bake with yeast, as the yeast is the most important ingredient to get right when learning how to make bread.
HOW TO MAKE BREAD - FLOUR
The best type of flour to buy is your bread flour, rather than white flour which is better for cakes and pastries. Bread flour has a higher gluten content which will give you a less crumbly texture and a better end product.Wholemeal flours should be fresh as they go stale far quicker than white or bread flours. They are also more moist and therefore you may have to add extra flour to the dough for easier handling if you find that it is sticking when kneading. You can also add gluten flour to certain bread recipes, especially those using rye flour, however, this is optional and not strictly necessary. If you are looking for gluten flour you will find it at your local health food shops.
HOW TO MAKE BREAD - ASCORBIC ACID
This is another optional addition to your bread. However, if added it will give your bread a much finer, even texture. This can be handy in countries where the bread flour available is not of good quality. You will be able to buy this at your local pharmacies if you ask for ascorbic acid powder or crystals. For every 4 cups of flour used, add 1/4 teaspoon of ascorbic acid powder.HOW TO MAKE BREAD - SALT
As well as enhancing the taste of your bread, the addition of salt acts with the yeast to promote an even texture. The ratio of salt to bread is for every 4 cups use 11/2 teaspoons of salt. However, in Italy, especially in Tuscany, traditional bread making there excludes the use of salt.HOW TO MAKE BREAD - ADDING YEAST TO THE LIQUID
Yeast is a living organism that can be killed if the water that you use is too hot, and if it is too cold you will wait much longer for it to react. The heat of the liquid used to add your yeast to should be warm to the touch, not hot. Sprinkle some on your wrist to test.HOW TO MAKE BREAD - ADDING THE FLOUR
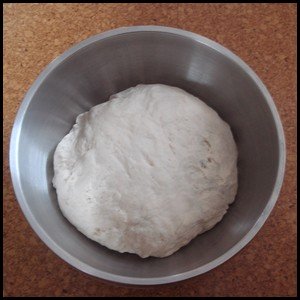
Make sure that your flour is at room temperature, especially if it has been stored in the fridge or freezer. First add enough flour to the liquid to make a thick batter, which then should be beaten thoroughly with a wooden spoon. Cover and leave this batter to stand in a warm place until it starts to froth with the yeast activated. Once it froths start adding flour until the dough becomes dry enough for form a ball that does not stick to your hands when handled and comes away from the sides of the bowl cleanly. Any dough left on the bowl should be added to the dough.HOW TO MAKE BREAD - KNEADING THE DOUGH

If you have the right flour and your yeast is fresh, kneading the dough is the next important step in your bread making. When making bread you cannot escape the fact that you will have to knead your bread for 10 minutes to get the gluten to develop in the flour and to create that light, even texture in your bread that you are after.
The way to knead your dough is to take it out of a bowl and place it onto a floured surface. With the heel of your palm press down on the dough and then fold the top-end of the dough circle back over to meet the bottom end, folding the dough towards you.

Then press down on the heel of your palm again, knocking out the air bubbles and repeating the process. You can also use two hands in the kneading process, although I often only use my right hand. While you are doing this, you will also need to rotate the dough quarter turn after each folding and pressing so as to make sure that the bread is well-kneaded on all sides.
After 10 minutes your dough should spring back when your lightly press down with a finger, and the texture should be smooth.
HOW TO MAKE BREAD - RISING THE DOUGH
 Grease the bowl that the
bread was originally mixed in with a little
oil. This will prevent the dough from sticking to the bowl when it
rises. Place your smooth, springy dough into the bowl and lightly oil
the top. Now, either cover the bowl with cling wrap or a kitchen towel
to keep the heat in, to prevent a skin from forming and to aid in the
rising process.
Grease the bowl that the
bread was originally mixed in with a little
oil. This will prevent the dough from sticking to the bowl when it
rises. Place your smooth, springy dough into the bowl and lightly oil
the top. Now, either cover the bowl with cling wrap or a kitchen towel
to keep the heat in, to prevent a skin from forming and to aid in the
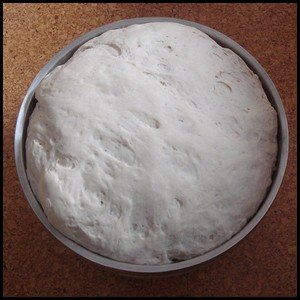
rising process.The dough should be left in a warm place free from draughts. I often place my bread in a sunny window, or if I am in a hurry, and I want my bread to rise that much quicker, I fill the sink up with a little hot water, place the bowl in the water and cover the whole sink and bowl with a heavy blanket to trap in the heat. However, don't make the water too hot, because if you hasten the rising process too quickly you can end up with a sour-tasting loaf.
You will need to wait for the bread to double in size. This can take a couple of hours, depending on conditions. If you want to leave this dough overnight to rise, then place it in a fridge for 12 hours. It should have doubled within that time ready for you to use in the morning for that nice loaf of homemade bread!
HOW TO MAKE BREAD - PUNCHING DOWN THE DOUGH
Once your dough has doubled in size you will need to remove the covering and knock out all the air that has formed in the rising process.
This is called 'punching down' and is done so that when you do bake your bread you will get an even texture.
If you want great looking bread, then don't leave out this important process to making your homemade bread.
HOW TO MAKE BREAD - SHAPING THE DOUGH
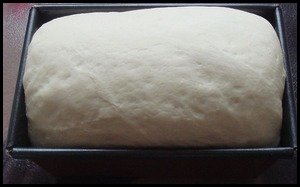
You are nearing the end of making your homemade bread. If you are using a loaf tin, grease it well and add some flour to the tin afterwards, shaking out the excess. This also helps to prevent the dough from sticking to the loaf tin.If your tins are small, you may have to divide the dough. Remember that your dough will be left to double in the tin again before it is cooked. So this should give you an indication as to whether you have the right sized tins.
Take your dough, flatten it out to a rough rectangle, making sure that the long side is the same size as your tin. Roll it up like a Swiss roll and pinch the edges together well. Place it in the oiled tin, seam side down and press it gently in the tin. Oil the top, cover and leave to rise again until it reaches the top of the tin.
HOW TO MAKE BREAD - BAKING YOUR BREAD
Once your dough has reached the top of the tin it is time to place it into a pre-heated oven. Here your bread will still rise a little more before the heat kills the yeast and the rising action is stopped.
Do not open the oven for the first half of the baking process to prevent your bread from collapsing.
HOW TO MAKE BREAD - TESTING YOUR BREAD
Once you are sure that your bread is ready take it out of the loaf tin and tap the underside of the bread with your knuckles. If you bread sounds hollow, it is cooked. The top should also be golden brown. If you are not sure, return the bread to the oven to bake for a further 10 minutes. If you think that your bread is browning too quickly, you can cover it with a sheet of tin foil placed lightly on the top.USEFUL BREAD MAKING TIPS USING YEAST
The most important tip I can give you is that your yeast must be fresh.Yeast cells are living organisms which multiply under favorable conditions, and produce carbon dioxide, which leavens the dough, as well as alcohol which is responsible for the unmistakable smell of yeast dough while baking.
To be successful in yeast baking the yeast cells require moisture, food (sugar or carbohydrates) and the correct temperature. If you don't have these 3 things, your yeast will not activate and you won't have good bread.
The best temperature for yeast activity is just above blood or body temperature (approximately 39 degrees C. - 42 degrees C.) Temperatures above this will harm or destroy the yeast cells. Temperatures below this will retard the activity. You can freeze dough, as well as put it in the fridge, however, you have to bring it back to room temperature and leave it until the bread dough has doubled in size.
If you are in a hurry or when the environmental temperature is very low, yeast quantities may be increased in moderation. However, there are several ways in which you can help the dough rising process without adding more yeast, which can compromise the taste.
Instead, wrap your bowl with cling film, then wrap in a duvet or blanket and place near your woodstove, or fireplace hearth. If you have some sun, you can dispense with the blanket and place the bowl in a window where the sun is shining. Or, you can fill the sink with fairly hot water - not too hot as you don't want to activate the yeast too much, and place the bowl inside the sink so that the water comes half-way up to the bowl. Place a blanket or towel over the top of the sink to keep the warmth in.
Now that you know how to make bread, visit our Quick bread Recipes page and get started on your bread making.
OUR RECOMMENDATION: BEST SELLING BREAD BOOKS
Baking bread at home can save hundreds of dollars on groceries every year. Artisan Bread in Five Minutes a Day will help you re-create great artisan breads in your own home, without investing serious time or money.
The process is simple. You mix water, yeast, salt, and flour in a large bowl with a spoon or just your hands. It doesn't take five minutes. You let it rise for a couple hours, then put it in the refrigerator for up to two weeks. Whenever you want a nice crusty loaf of bread, just tear off a chunk, let it rise again, and bake it. Not only is this much cheaper than store-bought bread, but you get to control the ingredients, and there's nothing quite like the smell of fresh-baked bread just out of the oven.
With this easy method, each loaf; deliciously crusty-on-the-outside, moist-and-chewy-on-the-inside, will cost you only about 50 cents and five minutes a day.
Now you can fill your kitchen with the
irresistible aromas of a French bakery every day with just five minutes
of active preparation time, and Artisan Bread in Five Minutes
a Day will show you how.
You can Add your own Comments, Tips and Ideas on How to Make Bread Here!
We have lots of pages where you can contribute to throughout this homesteading website. We love hearing from our readers, and hope you will be one of those we hear from too. Look around our homesteading website. If you have some comments, tips, recipes, questions or ideas on how to make bread of your own, please submit them. All you need to do is type and submit. We will do the rest!
Leave a Comment
Do you have anything that you would like to add after reading this page? We would love to hear your thoughts. If you can add additional information to what has been written here you will be adding value to the website! No need to have any special skills - just type and submit. We will do the rest!
Other Comments
Click below to see comments from other visitors to this page...
Thank you So Much! No Changes Needed! Not rated yet
Thank you! My bread turned out great! It was so good! I don't think you need any more information!
***
Hi Mary
I am really pleased that …
bread sticking to the bowl after rising Not rated yet
I've been making bread for a while, love it, we never buy store bought. All of a sudden, after 2nd rising, I remove dough from bowl, flip onto counter, …
Don't miss out on our latest news and articles. Sign up for our free monthly e-zine!
Go from How to Make Bread to Country RecipesGo to Quick Bread Recipes
Go back to Countryfarm Lifestyles and Homesteading
NAVIGATION COLUMN
Find us on Google+Country Shopping
Country StoreFree Stuff
Free MagazinesHomesteading Blogs
Country Living Blog Gypsy's WanderingsCountry Living
Country Home Country Living Country Crafts Country Holidays Picnics CampingSelf-Sufficiency
Self-Sufficient Living Organic Gardening Do It Yourself Easy RecipesHomesteading
Homesteading Today Homesteading Q & A Homestead Animals Urban Homesteading Homestead DirectoryGoing Green
Green LivingFarms Around the World
South Africa United Kingdom United States Canada Central America Australia New Zealand Europe Farm Photos Farming Articles True Farming Stories Farms for Sale Organic Farm ProduceMiscellaneous
Guest Book Search Site Survey Advertise with Us


OTHER SECTIONS OF INTEREST
 Country
Recipes
Country
Recipes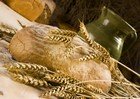 Bread
Recipes
Bread
Recipes Amish
Friendship Bread Starter Recipe
Amish
Friendship Bread Starter Recipe Amish
Recipes
Amish
Recipes
New! Comments
Do you have something of value to add? Leave me a comment in the box below.