How to Make Butter by Churn, Beater or Jar with Recipes
Learn how to make butter with a traditional butter churn, electric beater or just a simple jar. Follow our butter making instructions for your own homemade butter making including recipes.
As long
as your cream
has a high fat content, and is 2-3 days old, you should have no problem
at all making delicious butter without any additives or preservatives.
We also tell you how to make clarified butter.
In days gone by, butter making was done
in every household, as well as cheese
making. However, people tend to be too busy with
families and careers these days, and the art is not widely practiced.
However, I like homemade butter because at least I know what went into
it.
I can also use the buttermilk for making cheese, feeding my chickens,
or adding to my
bread dough and muffin mixture as it make them that much lighter!
Tips on How to Make Butter
To be successful with making butter you need to make sure that:
- Your cream has a high fat content. Cream from Jersey cows, therefore, ensures success as the cream that they produce has just what you are looking for in fat content.
- Your cream isn't too fresh. It needs to be a couple of days old so that it has ripened sufficiently to turn into delicious homemade butter.
- The cream needs to be ripened at the right temperature otherwise your butter can be bitter.
- The cream should not be too thick.
- The milk should come from grass-fed cows. Those fed on hay will not give you a good tasting butter.
How to Make Butter by Separating the Cream from the Milk
There are 3 ways of separating the cream from the milk:1) Shallow pan method
2) Deep setting method
3) Separator machine
1) The shallow pan method makes good butter if you don't have a separator machine. While the milk is still warm from the cow place the milk into shallow pans 6-8 inches deep. Leave to stand for 12 - 24 hours and then skim off the cream with a perforated skimmer spoon.
Cream produced like this is usually very good. It will be thick and sweet and under favorable conditions will make excellent butter. However, if you are doing this in a warm climate then your cream will probably spoil before you get the chance of making your butter.
2) The deep setting method is allowing the milk to sit in milk cans at a depth of about 15 inches, with or without the lids on. They are then immersed in cold, running water.
Cream produced like this will give you quite a large quantity, however it will be thin with a poor percentage of fat, resulting in not the best of butters.
3) Using a milk separator will separate your cream from the milk in minutes. You will have the most success by making butter from cream separated like this.
Cream produced like this will yield more cream than the other 2 methods. There will be no more than 1% fat left behind. This means more cream, which means more butter.
How to Make
Butter by Ripening the Cream
 As already mentioned
your cream has to be well ripened in order to make good butter. How
many days this will take will depend on the weather.
As already mentioned
your cream has to be well ripened in order to make good butter. How
many days this will take will depend on the weather. During the summer you can pour the cream out into a deep pan during the early evening and make your butter the following morning.
However, during the winter, you will have to ripen your cream near on open fire, turning the pan occasionally to make sure that heat reaches the cream evenly, and this is done over 2 -3 days.

What you are wanting at that end of this is for the cream to clabber. This means that when you tilt the pan the whole lot leaves the sides cleanly and the liquid holds together and moves as one mass. This shows you that the cream has clabbered. It will also have started to sour.
Cream, when ready for churning, has a smooth, velvety appearance and a pleasant acid flavour.
However, you don't want it to go rotten. This is when the ripening process in your butter making has gone on for too long and has spoiled. You will know when this has happened because the cream will curdle and separate. If you make butter from curdled milk it will not make good butter.
So, now, at this point, perhaps you want to get a little more scientific about your homemade butter.
The best results in cream ripening are obtained at a temperature of from 58 to 68 Fahrenheit, although the lactic acid bacteria increase in activity up to a temperature of 100 to 110 degrees Fahrenheit. If the cream is ripened at a temperature higher than 75 degrees Fahrenheit you will not end up with good butter. Your butter will end up being too soft.
It is not safe to ripen cream below 60 F. Cream quickly ripened and then held at a temperature of 45 F. for 24 hours will clabber correctly, won't rot or make your butter bitter. However, if you hold the cream at say, 45 F. for 24 hours and then ripen your cream the butter will develop a bitter flavor.
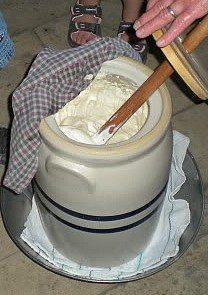
How to Make Butter the Traditional Way with a Churn and Dasher
Traditionally butter was made using a butter churn and a dasher. It was either a wooden butter burn that stood upright, or a stone pottery cylindrical vessel that narrowed at the top that was big enough to place the dasher into. Later on there were butter churns that were barrel shaped and came with a handle, glass butter churns fitter with an egg-beater like contraption, and later electic-driven butter churns. I prefer a stone pottery butter churn as they are easier to keep clean and free of bacteria.A dasher is a wooden butter churning tool that could be made in two ways. It was a long-handled pole with 2 slats attached to the base of the pole each placed in the opposite direction to the other so that you end up with a cross. Each wooden slat was about 4 inches long, 2 inches wide and 1/2 inch thick.
Another way of making a dasher was to make a circular base, 4 inches in diameter and 1 inch thick. Drilled out of this circular base were 4 holes, 1inch in diameter, and equidistant from each other.
Make sure your churn and dasher is abolutely clean before you start making your homemade butter. This is very important as your cream will be full of bacteria which will spoil your butter. Scald the butter churn with boiling water, and follow with a thorough rinsing of cold water.
Cream should be cooled down to the churning temperature for several hours before churning, as this gives a much firmer butter than if it is merely cooled down just before churning.
Generally speaking, the normal churning temperature is 55 to 56 degrees Fahrenheit, but the temperature may vary from 50 to 62 degrees Fahrenheit.
If you churn when the cream is too high a temperature it will produce butter in a very short time, but with a loss of fat in the buttermilk.
If you churn when the cream is too low a temperature you will be churning for a very long time and the butter produced will be hard and difficult to work with.
In summer a churning temperature of from 54 to 56 degrees Fahrenheit is wanted and in winter from 58 to 62 degrees Fahrenheit will give good results under normal conditions.
Large quantities of cream require a lower churning temperature, from 48 degrees Fahrenheit in summer and up to 56 degrees Fahrenheit in winter.
| Countryfarm
Lifestyles Tip for How to Make Butter: Regulate the
temperature of the cream by either putting the cream into a bowl that
has been placed on top of another bowl packed with crushed ice blocks
or hot water. Stir until the correct temperature has been reached. Both the temperature and thickness may be regulated at the same time by adding the water warm, or cold, as required. Under no circumstances put ice or hot water directly into the cream. |
Place the dasher into the churn and pour in the clabbered cream through a strainer to remove any grass etc. that may be in your cream.
Close up the churn with the tight fitting wooden lid that has a hole for the dasher but will prevent the cream from splashing everywhere.
For the next 30-40 minutes agitate the cream by moving the dasher up and down continually until your cream starts turning to butter. You don't want to churn too quickly as this will make the cream hang around the churn and not gather into the fat globules you need. Too slowly, and you have issues again.
The more quickly you churn your cream, the paler, and softer your butter will be and less rich than if you churn more slowly. When it is summer you will need to churn slower so that you don't end up with soft, white butter. In the winter you need to churn more quickly to keep the temperature up.
Don't over-churn your butter. If you do, you will end up losing that lovely yellow color and again your butter will be pale.
| Countryfarm Lifestyles Tip for How to Make Butter: For the first 5 minutes of churning, open up the vent from time to time. There will be some gas build-up in your churn, and by allowing theses gasses to escape. If you don't your cream becomes frothy and then difficult to churn. |
Temperature will have a lot to do with how your butter will turn out. If the temperature is too hot your butter will be quite white and fluffy looking. You can add a small amount of cold water at this stage to see if you can improve the texture.
If the temperature is too cold your butter will find that your butter has not really gathered together properly with a lot of smaller globules of fat that has separated out. You can add a small amount of hot water will help draw the globules together.
Once the butter fat globules have all clumped together in small, pea-size pieces stop churning and remove it from the churn. If you carry on churning it makes it more difficult to separate the buttermilk and to distribute the salt evenly. You can place cold water into the churn to float the butter pieces and remove with a strainer.
This water is from 3 to 10 degrees lower than the churning temperature. For example, in summer, say 42 to 45 degrees F., or as cold as possible, and in winter 3 to 4 degrees below the temperature at which churning has been done.
The reason for adding water at this stage is to reduce the temperature, which rises during churning, and to harden the grains of butter so that their size may be increased without the risk of churning the butter into lumps. The addition of the water also assists in getting rid of any caseous matter.
It is difficult to say just how much water you will need to add at this stage because it depends on how much cream is in the churn, what the temperature is etc. However, I suggest you put in just small amounts of water rather than the full amount so that you can judge the conditions accordingly.
| How much Butter will I get from 1 Gallon of Cream? About 3 pounds. |
At this stage there are 2 thoughts on what to do next.
How to Make Butter - Washing the Butter
Some people will place the butter straight into the fridge for a day to rest without rinsing it, and before salting it and working it. Others will rinse the butter in cold water and then salt and work it straight away.It really is up to you, and personal taste. What is not up for dispute, is that the liquid left behind is homemade buttermilk which can be poured and stored in your fridge for drinking and for baking. Your pigs and chickens will also love your for it!
When salting the butter use 1/4 to 1/2 teaspoon for each pint of butter.
If you are not going to place your homemade butter in the fridge first then you can rinse your butter using iced water. Place a handful of ice cubes in a bowl that now holds the warm butter. Stir the ice cubes through the butter until it melts.
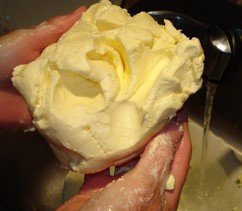 Now taking your clean hands, and start working
the butter, You need to squeeze
the water through the butter several times.
Now taking your clean hands, and start working
the butter, You need to squeeze
the water through the butter several times. The coldness of the ice allows for the butter to handle better and is easier if you are going to place it in molds. You can also wash it several times, if you like. However, never wash the butter as shown in the picture left.
You should only add as much water to the butter as the amount of cream added at the beginning. Too much washing will result in washing away the delicate flavor of the butter.
| Countryfarm Lifestyles Tip for How to Make Butter: The type of water you use for washing is important. Any water that is not pure will result in imparting that taste of that water to the butter. Use pure spring water only. |
Usually, one washing is more than enough.
Squeeze out the excess water and place in your molds. Traditionally, wooden butter molds were used that had lovely patterns carved into the wood.
| Countryfarm Lifestyles Tip for How to Make Butter: Leave the butter for 4-6 hours. If there are streaks in the butter the salt has not been worked in evenly. Rework again. |
How to Make Butter in a Jar
How to Make Butter using an Electric Beater and Store-bought Cream
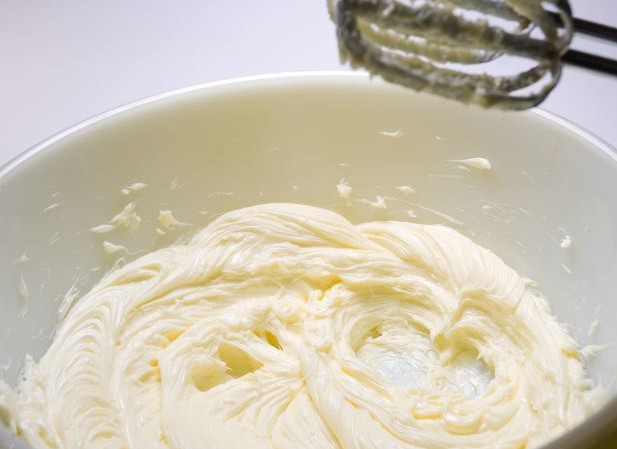
Take 500 ml double pouring Jersey cream that has been allowed to clabber at room temperature. Pour into a bowl, and using a hand-held egg beater, start beating the cream. If you have the right conditions within 20 minutes or so, the cream will start to solidify and buttermilk will be the by-product. You can also use a stick blender.
Once the fat solidifies and you have buttermilk, drain off the liquid and reserve for your baking or cheese making. Now you need to wash the butter, squeezing out any extra buttermilk.
To do this, add a cupful of iced water to the butterfat and beat the contents briefly. Pour off the milky water and repeat the process until the water remains clear after beating. Pour off the last of the water and then mash the butterfat with a fork getting any water out that may have been left behind. Drain this off too, and when you are happy with the butter, add salt to taste as this will prevent the butter from souring.
Finally, take the butter, smooth it into a container, cover and place in the fridge. It will be ready to use within a couple of hours. The butter will keep for a week or two. This recipe will make 300g of butter.
How to Make Butter - Herb Butter Recipes
- Cut up chives, and add them at the end.
- A classic herb butter is adding small quantities of fresh tarragon, parsley and thyme with a dash of black pepper.
- For a slightly different flavor, and if your cream is too fresh, you can add 2 tablespoons of either crême fraiche, yogurt, or sour cream to your cream before you start to beat.
For best results leave the cream at room temperature for about 24 hours at 24°C, lower the temperature to 15°C by placing it in a double bowl with crushed ice in between each bowl, and then beat to make butter.
Homemade Devonshire Cream Recipe
varying with the time of year. (If the weather is too hot you will not be able to do this.)
The pans are now removed to a stove and the milk heated very gradually to a temperature of 170 to 190 degrees Fahrenheit. This should be done very slowly, or the proper flavour is not obtained. 20 to 30 minutes is the minimum time which should be taken.
The pans are then removed to the dairy and allowed to cool, and in summer they are often placed in cold water. The cream is skimmed off after about 12 hours, using a perforated skimmer. Clotted cream may be churned, but in this case the scald is not so high, 170 Fahrenheit being the maximum.
The old-fashioned method of churning clotted cream was to place it in a tub and stir or beat with the hand till butter is produced. Butter made from clotted cream requires thorough washing to remove the butter-milk or the keeping properties will be poor.
How to Make Butter Troubleshooting: I can't get my Cream to Turn to Butter
You will probably find if your cream doesn't turn to butter that you have problems with the following:- The cream is too thin
- The temperature of your cream is too low
- The cream has a high viscosity
- The churn is too full
- Your speed of agitating the cream in the churn is either too high or too low
- There is colostrum in the milk
- The cream is abnormally rich
How to Make Butter Troubleshooting: My Butter went Rancid
- The milk was dirty
- The churn wasn't cleaned properly
- The cream was over-ripened
- Not enough buttermilk was removed
- The water was not pure
A Video on Making Butter
How to Make Butter with Kits
If you are serious about making homemade butter, these days you can buy butter kits that has everything you need for making your own butter. There are a number of suppliers on the Internet.How to Make Butter Books, Churns and Butter Kits
Finally, if you are looking for more information on how to make butter, or wanting to buy some butter making equipment, we offer you these from our valued partners Amazon.com.You can Add your own Comments, Tips and Ideas on How to Make Butter Here!
We have lots of pages where you can contribute to throughout this homesteading website. We love hearing from our readers, and hope you will be one of those we hear from too. Look around our homesteading website. If you have some comments, tips, recipes or ideas on how to make butter of your own, please submit them. All you need to do is type and submit. We will do the rest!
Leave a Comment
Do you have anything that you would like to add after reading this page? We would love to hear your thoughts. If you can add additional information to what has been written here you will be adding value to the website! No need to have any special skills - just type and submit. We will do the rest!
Other Comments
Click below to see comments from other visitors to this page...
Better Buttermilk Instructions than the Buttermilk Page 
The page, How to Make Buttermilk, was such a letdown! It draws us in, describing how much better churned buttermilk is than cultured buttermilk, and then …
keeping the color and flavor in butter making Not rated yet
I had issues with the water when making butter. I notice that the much of the flavor and some of the color(beautiful yellow) goes away when I use cold …
Goat's Milk Butter Not rated yet
You spoke of using a high fat content milk to make butter.
Can you use goat's milk to make butter? Nubian goat's milk has a high fat content.
…
Don't miss out on our latest news and articles. Sign up for our free monthly e-zine!
NAVIGATION COLUMN
Find us on Google+Country Shopping
Country StoreFree Stuff
Free MagazinesHomesteading Blogs
Country Living Blog Gypsy's WanderingsCountry Living
Country Home Country Living Country Crafts Country Holidays Picnics CampingSelf-Sufficiency
Self-Sufficient Living Organic Gardening Do It Yourself Easy RecipesHomesteading
Homesteading Today Homesteading Q & A Homestead Animals Urban Homesteading Homestead DirectoryGoing Green
Green LivingFarms Around the World
South Africa United Kingdom United States Canada Central America Australia New Zealand Europe Farm Photos Farming Articles True Farming Stories Farms for Sale Organic Farm ProduceMiscellaneous
Guest Book Search Site Survey Advertise with Us


OTHER SECTIONS OF INTEREST
 Self
Sufficient Living
Self
Sufficient Living How to
Milk a Cow
How to
Milk a Cow Making
Yogurt
Making
Yogurt Ice
Cream Recipes
Ice
Cream Recipes How to
Make Cheese
How to
Make Cheese
Country Crafts
New! Comments
Do you have something of value to add? Leave me a comment in the box below.